
The AeroRadar handbook
Know your sky.
Know your app.
From your first flight to the finer settings. Follow a task step by step, explore a feature, or find the control you need.
No matching chapters. Try a shorter phrase or clear the search.
Chapter 01
Get started
Open Open AeroRadar
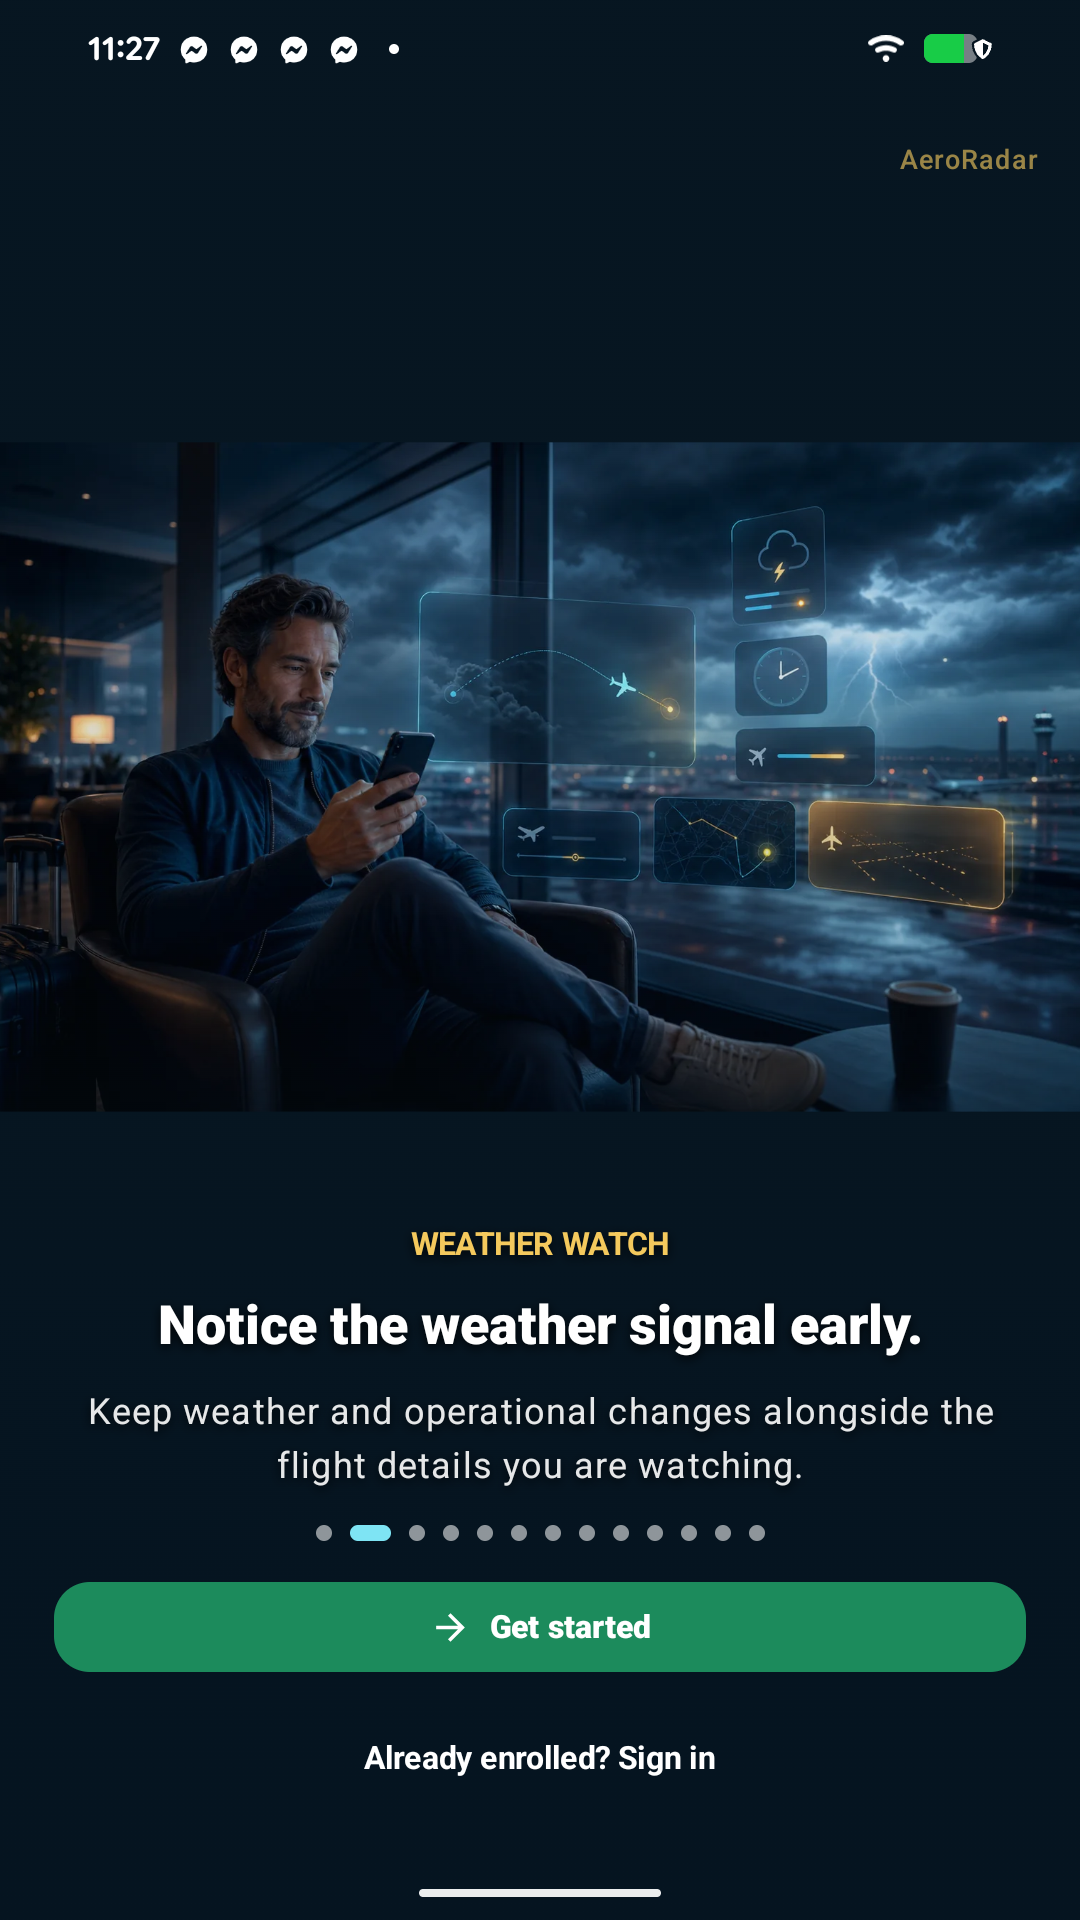
- Install or update AeroRadar from Google Play. Open the app and work through the welcome screens.
- Choose a sign-in method offered on your screen. Complete email verification or your enrolled second factor if requested.
- Review the trial or subscription options shown for your account. Wait for the app to confirm access before entering the map.
- Allow location when you want GPS centering or Sky Spotter. Camera and microphone permissions are only needed for features that use them.
- On the live map, tap an aircraft to begin. Open Menu to explore the other views.
This guide describes Android build 1684 (0.1.1348). Some screenshots show earlier builds; each is labelled. Features and data can vary with your installed version, account access, device and region. Public release and internal-testing updates may arrive at different times.
Chapter 02
Find your way around
Open Live map → bottom toolbar
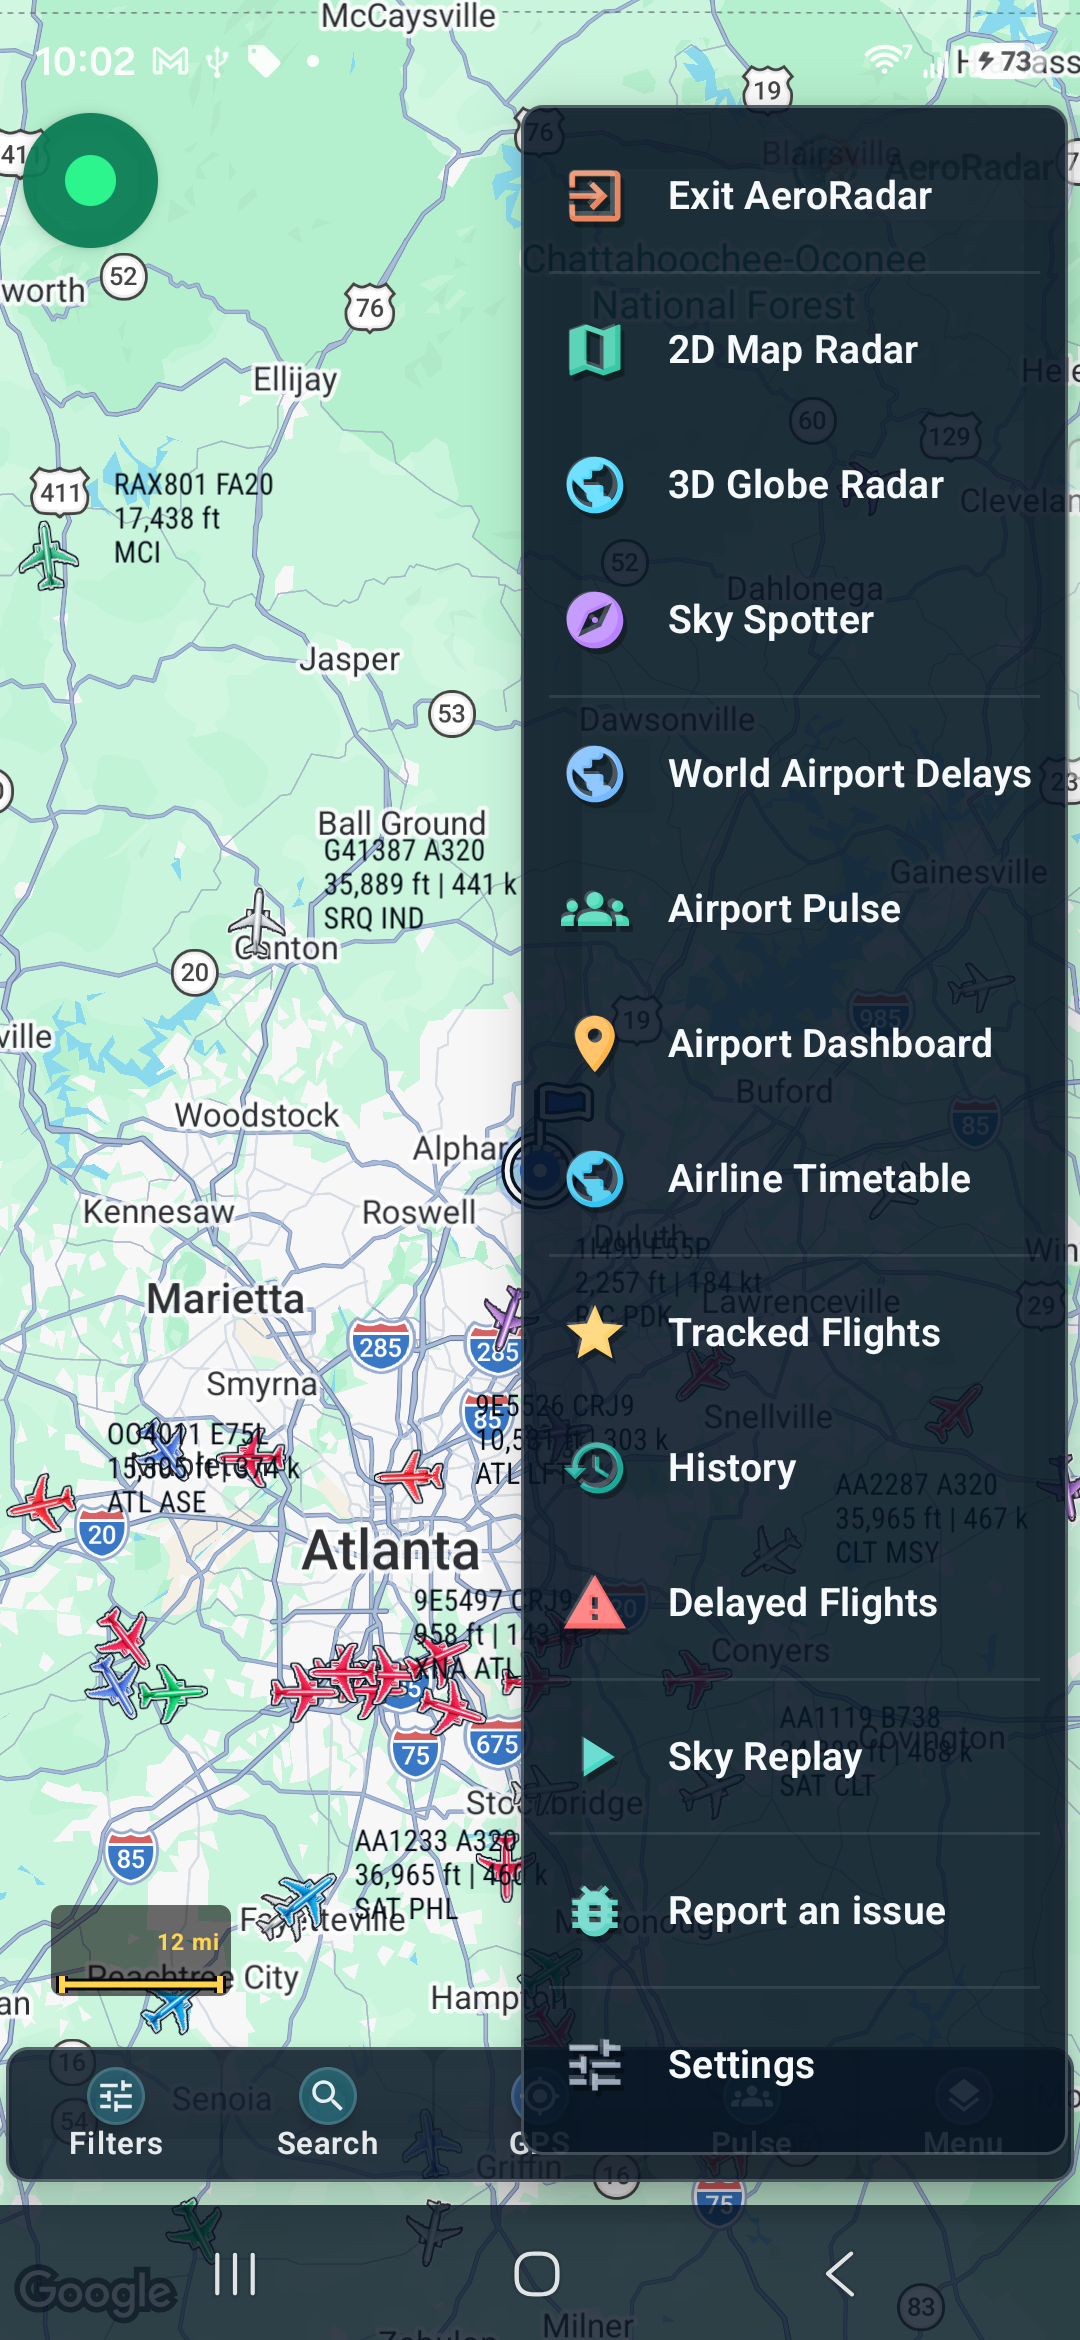
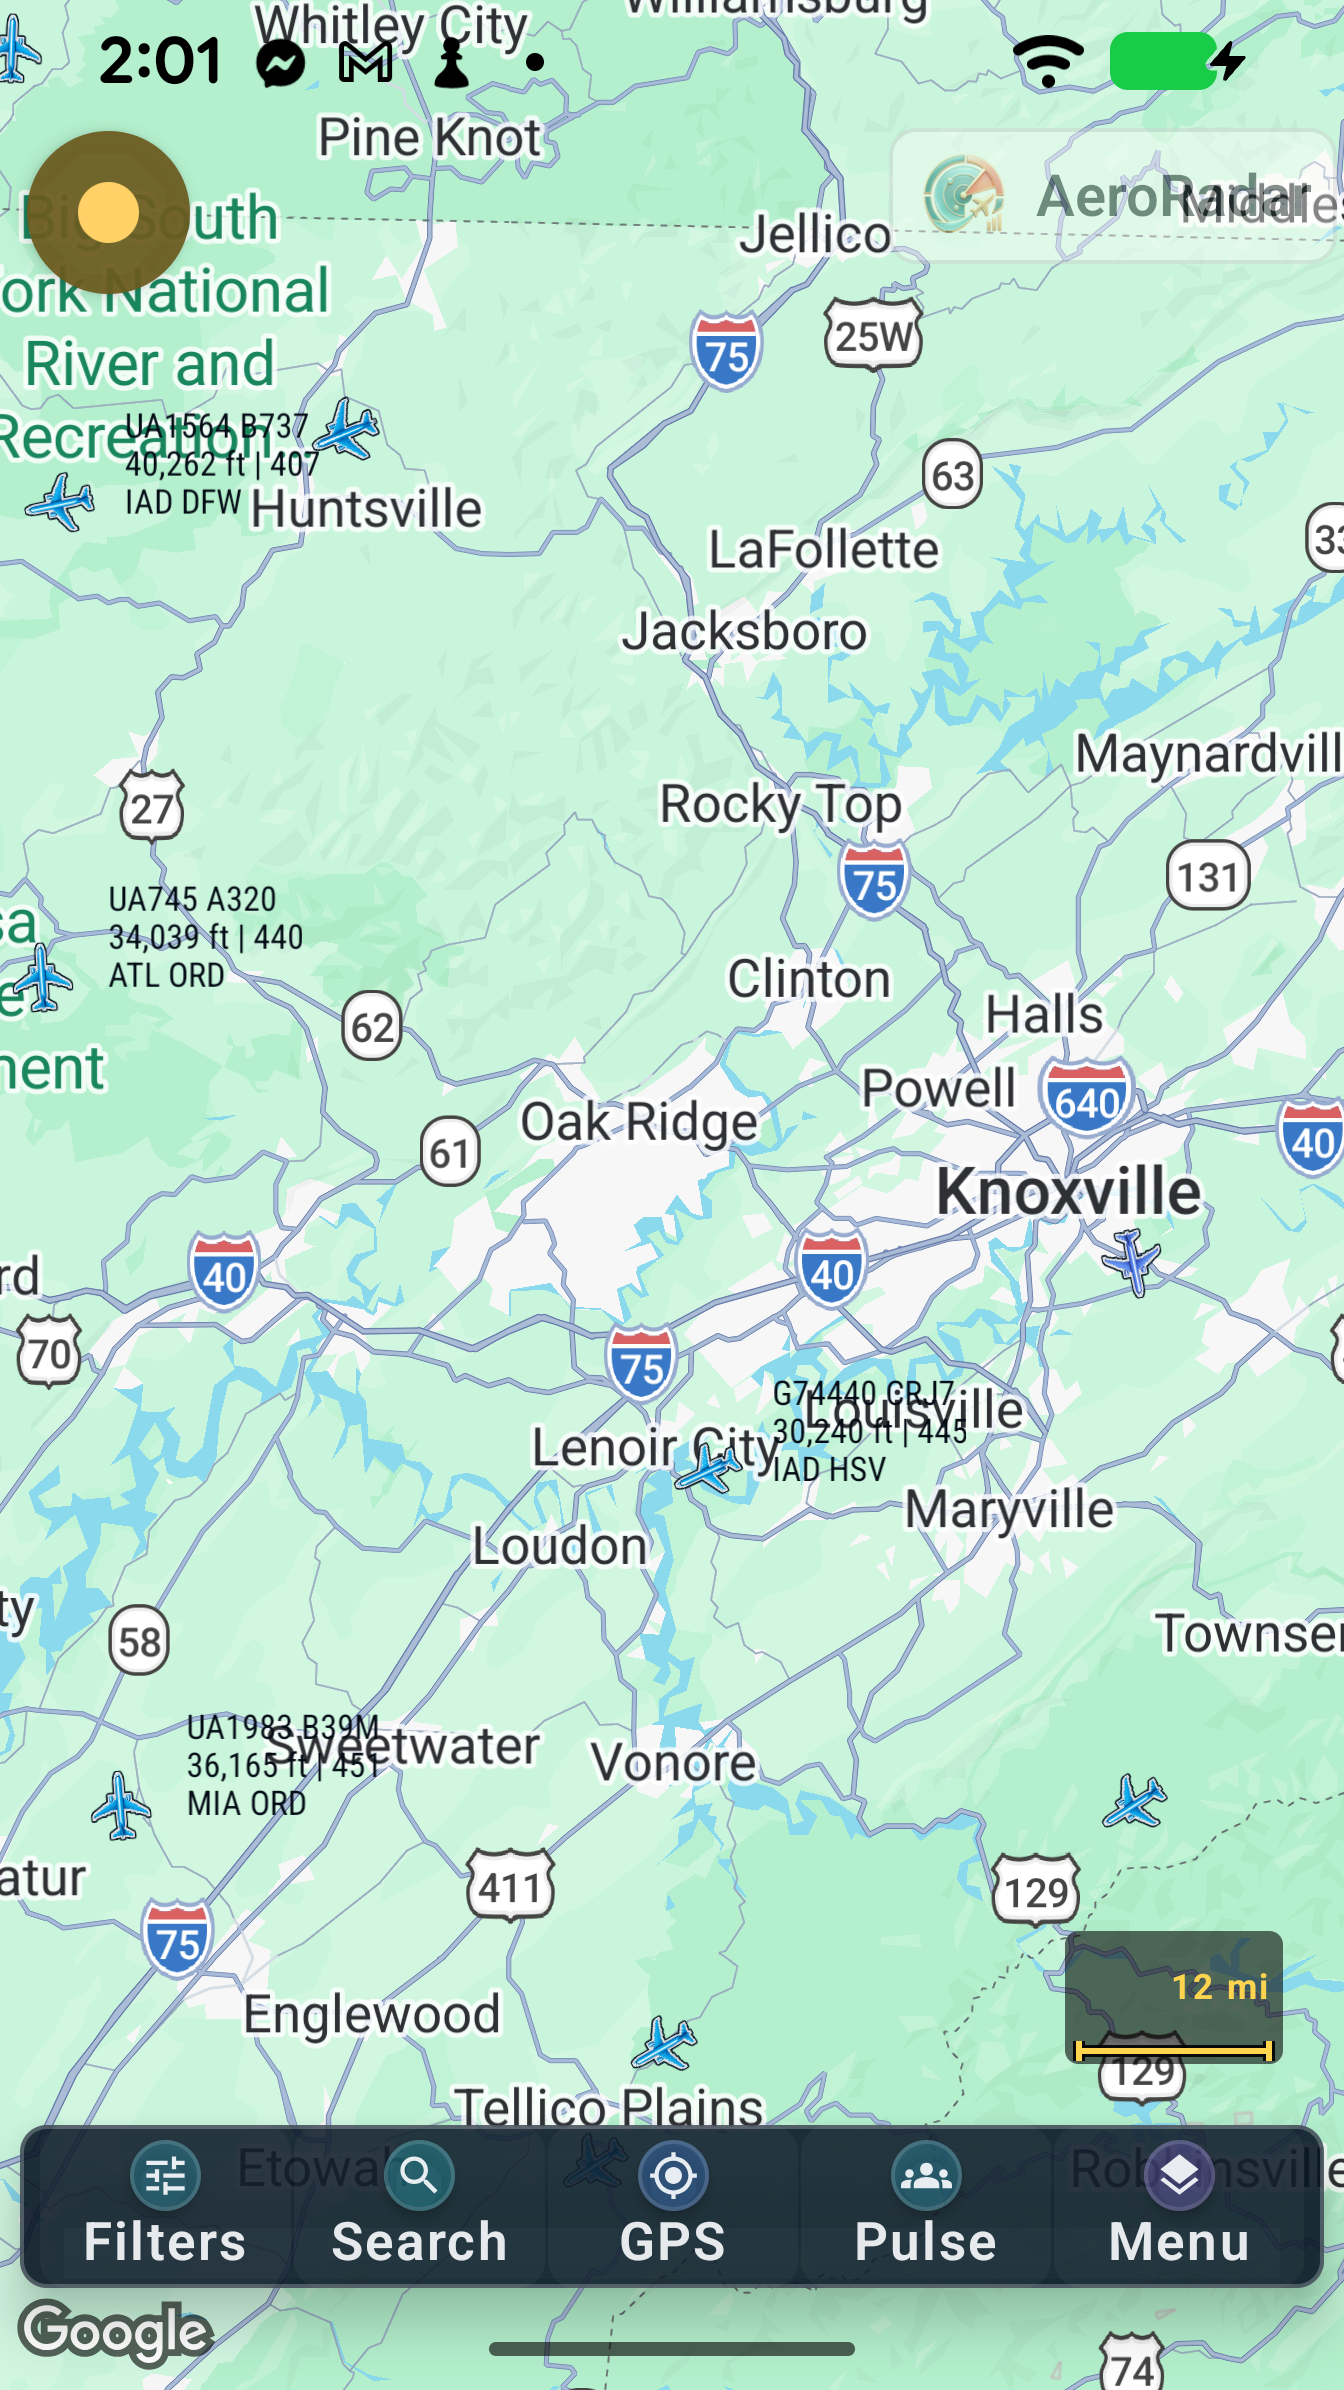
- Use the bottom toolbar: Filters narrows traffic, Search finds flights and airports, GPS centers your location, Pulse opens Airport Pulse, and Menu lists the main views.
- Tap Menu and choose a view. To return to the live map, choose 2D Map Radar.
- In a panel, use its Back arrow to return to its parent. Use Close (×) to return to the map.
- Swipe inside a long panel to reach controls below the first screen. Swipe a horizontal control strip sideways to reveal more buttons.
Menu includes 3D Globe Radar, Sky Spotter, World Airport Delays, Airport Pulse, Airport Dashboard, Airline Timetable, Tracked Flights, History, Delayed Flights, Sky Replay, Report an issue and Settings.
Chapter 03
Explore the live 2D map
Open Menu → 2D Map Radar
- Drag to move around the map and pinch to change zoom. Use GPS when you want to return to your position.
- Tap an aircraft icon. Its flight card opens and the selected aircraft becomes the focus.
- Expand the card for additional flight information. Close the card when you want an unobstructed map.
- Use Filters to reduce clutter, or change labels, trails and airport markers in Settings → Map and display.
- Check the traffic status before interpreting a quiet map. An empty view can mean no matching traffic, an active filter or unavailable data.
| Control or message | How to use it |
|---|---|
| Live | A recent shared traffic snapshot is available. |
| Calc | Aircraft positions are being estimated within the allowed freshness window. |
| Stale | A usable recent shared snapshot is unavailable or too old. Wait for refresh or use the HUD refresh control. |
| PAUSED | Traffic refresh is paused in the current app state. Return to the live view to resume. |
Chapter 04
Read flight details and follow a flight
Open Tap a map aircraft or a matching flight search result
- Check the flight identifier, airline, aircraft type and departure/arrival airports. A callsign and a marketed flight number may differ.
- Expand the flight card to see the information available for that flight, including position, altitude, speed, schedule and route context.
- Read the observation time and status. Scheduled information, observed positions and calculated positions describe different things.
- Use the flight’s tracking action to keep it in Tracked Flights, or its replay action to inspect retained movement.
- Open available airport or notice details from the card when you need more context.
A missing gate, registration, time or route means that information was not available. It does not establish that a flight was cancelled or landed. Airport and airline sources remain the authority for travel decisions.
Chapter 05
Understand completed, calculated and remaining paths
Open Flight details → path legend
- Select a flight and make sure Route paths is enabled in Settings → Map and display.
- Read the legend beside the flight details rather than inferring meaning from color alone.
- Follow the completed path to the latest historical position. The line connects retained samples; it is not a recording of every point flown.
- Use the calculated segment to understand the estimate between a recent observation and the estimated present position.
- Treat the contrasting dashed segment to ARR as remaining-route context. It is not the aircraft’s filed or cleared route.
During selected-flight replay, the completed portion is drawn to the playback position. Ordinary intervals between stored samples do not turn the completed route into a dashed prediction. Estimated current movement and the remaining route have separate meanings.
Chapter 06
Replay one selected flight
Open Select a flight → replay action
- Select the flight on the map, in Search or from a saved entry.
- Open replay from its flight details and wait for the available history to load.
- Press Play. Pause when you want to inspect a point, move the time slider to another moment and change playback speed as needed.
- Read times against the replay cursor. The selected replay position is historical, even if the live flight has already landed.
- You can switch between supported 2D and 3D views while preserving the selected flight and replay controls. Exit replay to return to live traffic.
Replay requires retained observations for that flight. A selected aircraft from an earlier session may no longer have a live position; this does not create missing history.
Chapter 07
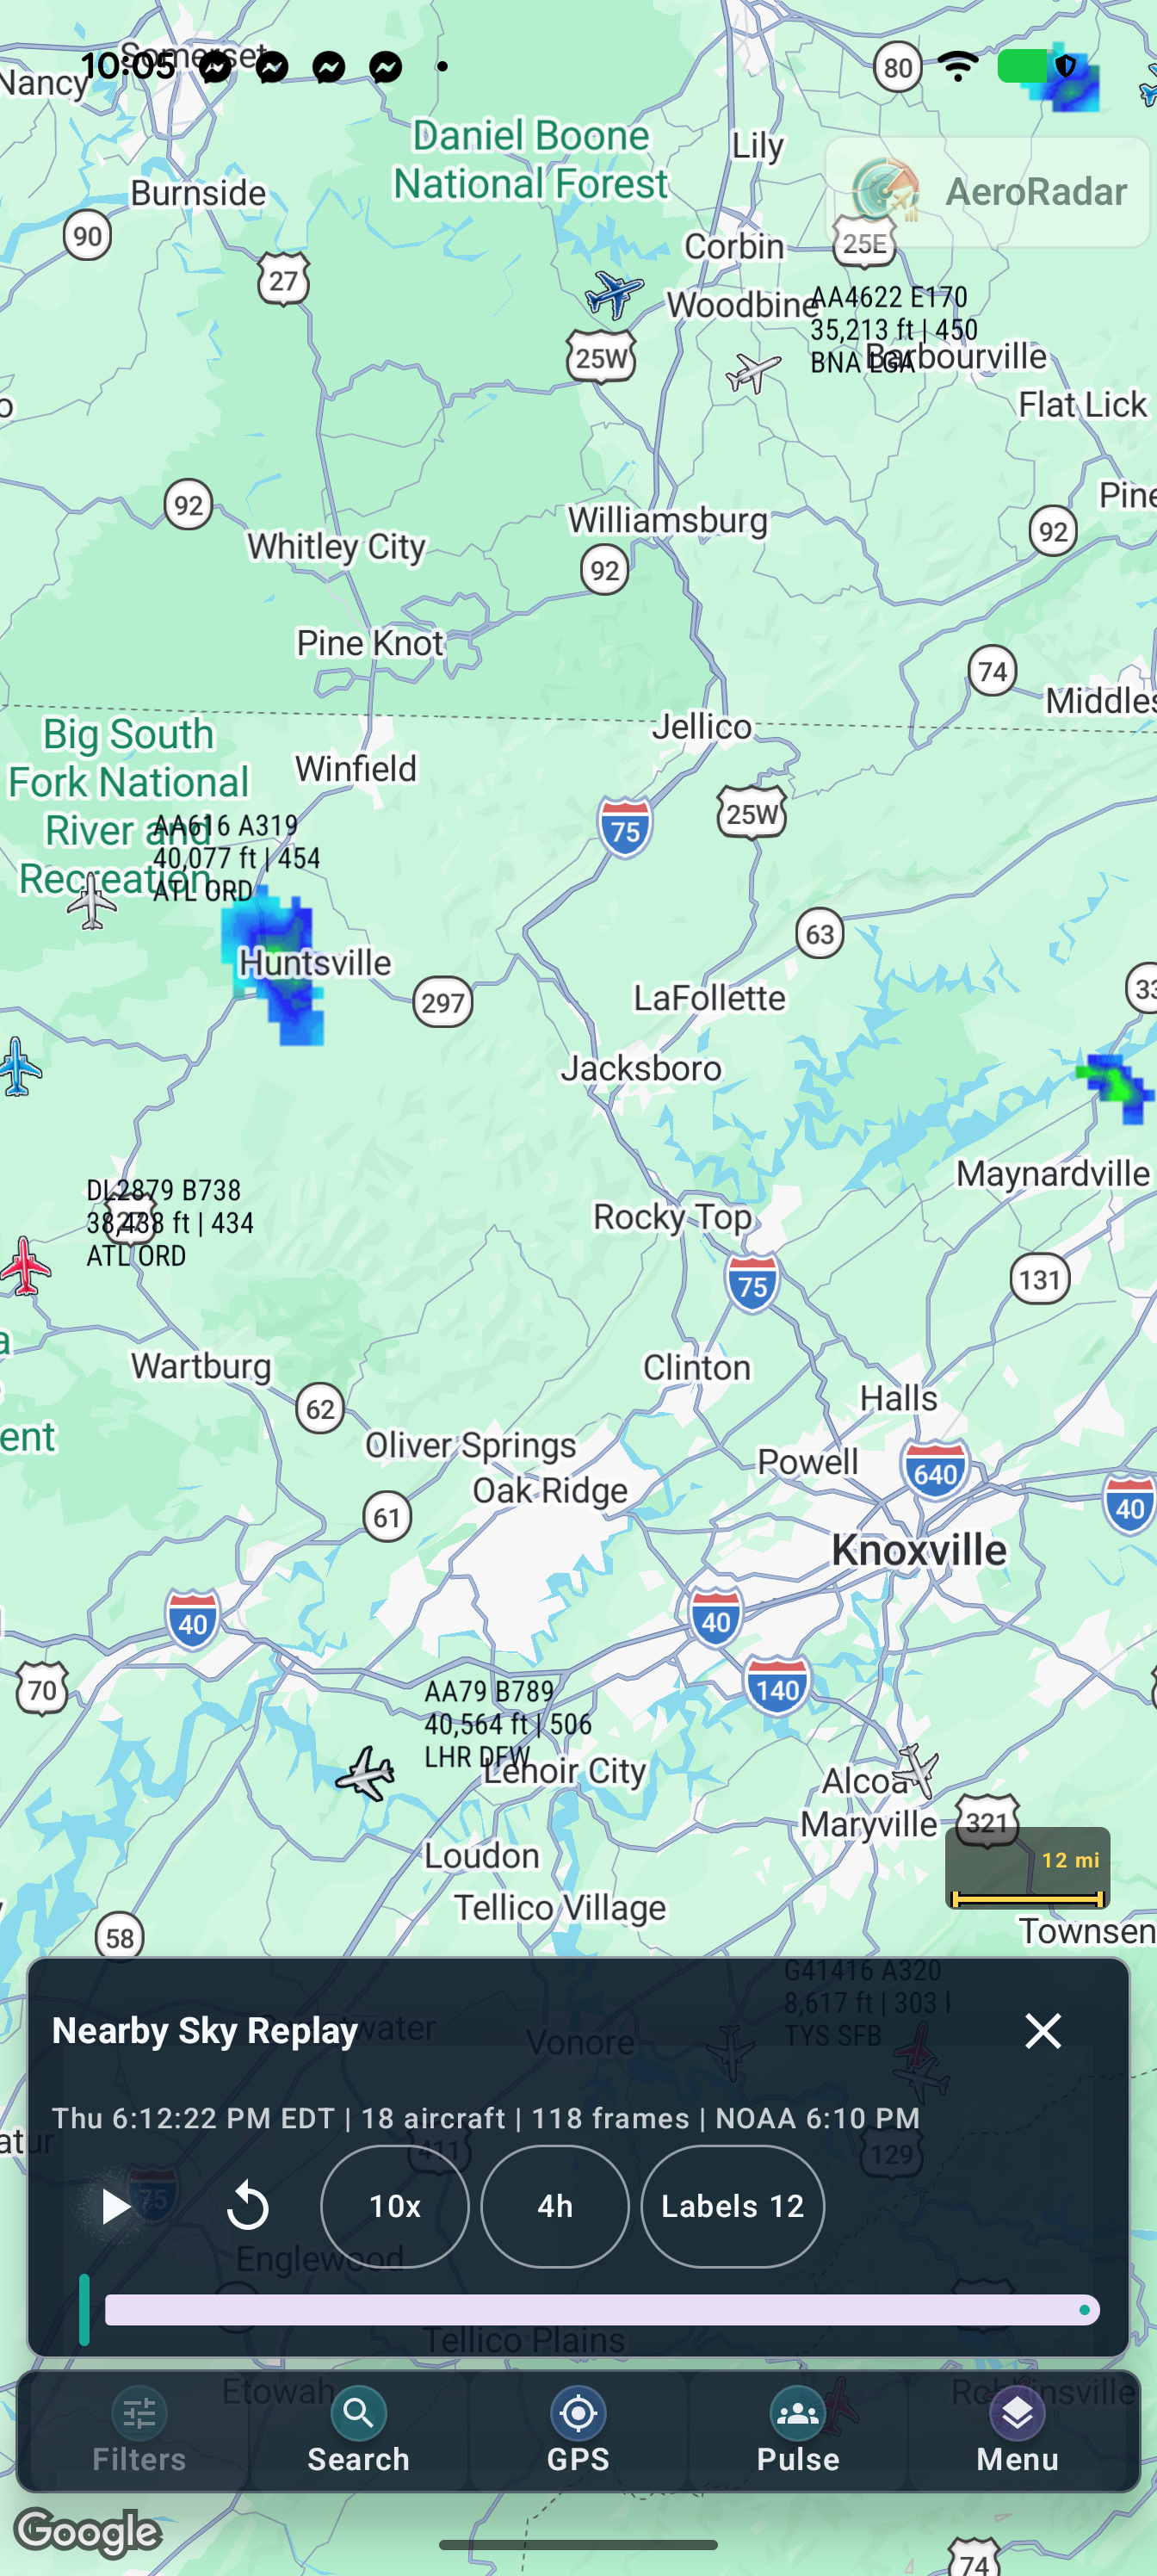
Replay the nearby sky
Open Menu → Sky Replay
- Move the live map to the area you want to revisit, then open Menu → Sky Replay.
- Choose a lookback window: 1, 4, 8, 12 or 20 hours.
- Wait for the retained traffic for that area and interval to load. Start playback.
- Pause, restart, scrub the timeline or change speed to inspect traffic movement. Adjust label density if the map is busy.
- Close replay to return to the live map. Change the area and reopen replay to explore elsewhere.
Nearby Sky Replay shows recorded traffic for an area; selected-flight replay follows one aircraft. Live filters do not define the replay dataset. A selectable time window does not guarantee complete history for every flight.
Chapter 08
Use Sky Spotter
Open Menu → Sky Spotter
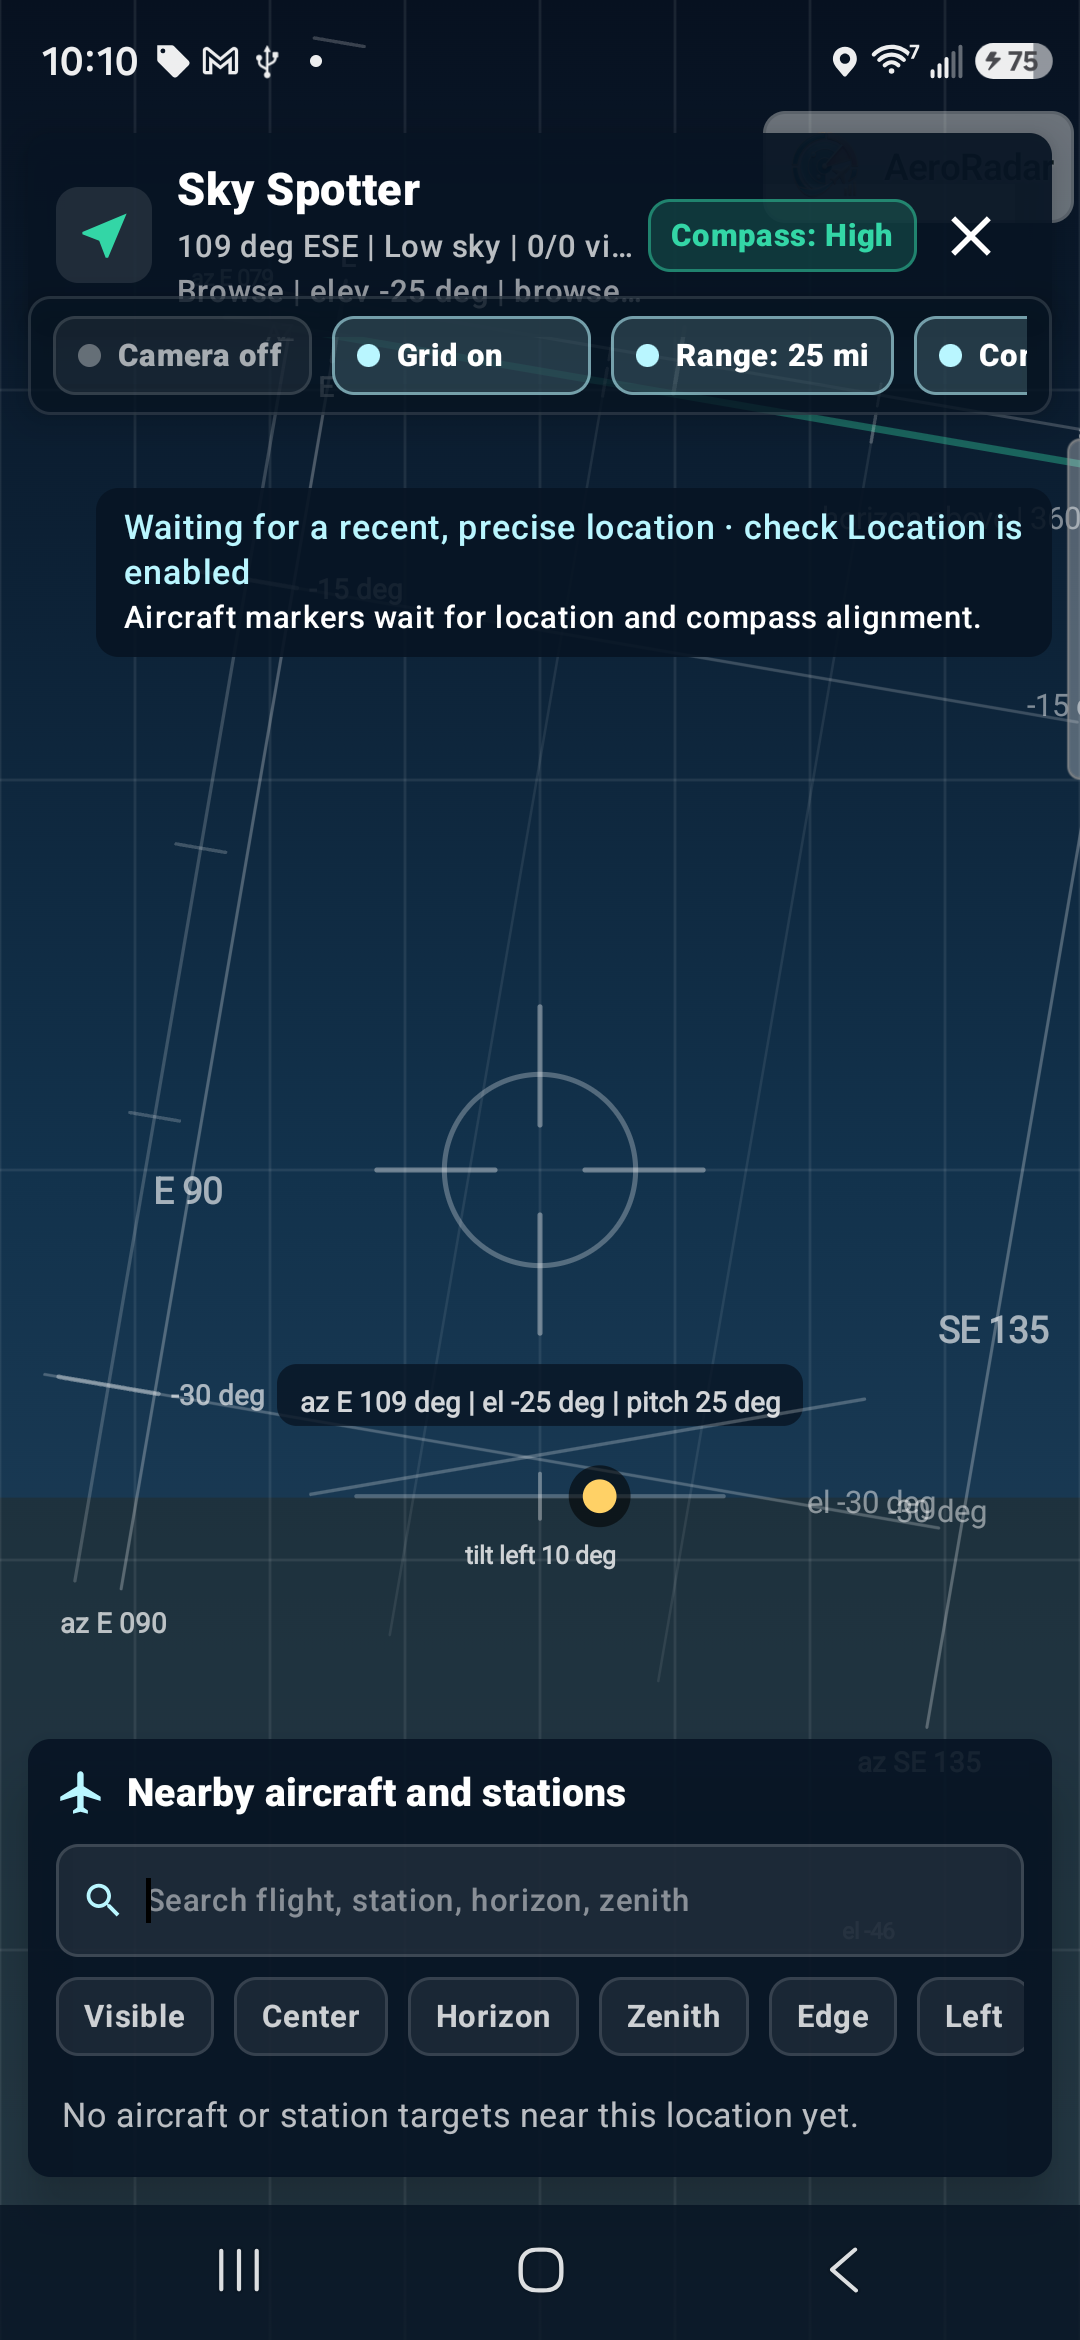
- Open Sky Spotter from Menu. Allow location and wait for a usable GPS fix. Camera permission is optional if you use the simulated sky.
- Start with Range set to 10 or 25 miles. If a live aircraft filter is active, clear it when you want to see all eligible nearby aircraft.
- Hold the phone upright with its rear camera facing outward. Point it toward the horizon, then tilt upward toward the aircraft you can see.
- Turn slowly left or right. Follow the compass calibration guidance if shown and move away from magnetic cases, metal surfaces or other interference.
- Look at the nearby-target tray. Tap an aircraft to focus it; follow the direction guide to bring it into view.
- Use Camera, Grid and Compass independently. Swipe the top control strip sideways for controls that do not fit on the screen.
| Control or message | How to use it |
|---|---|
| Camera on / off | On uses the rear camera as the background. Off uses a simulated sky and releases the camera. Camera setup requests permission when necessary. |
| Grid on / off | Shows or hides the sky grid over either background. It is separate from Camera and Compass. |
| Range | Choose 5, 10, 15, 25, 30, 40 or 50 miles, or All. The filter includes altitude in distance; All still depends on available coverage. |
| Compass on / off | Shows or hides heading and level readouts. Sensor-based aircraft alignment continues when the readouts are hidden. |
| Aircraft / Stations | Control aircraft and available space-station targets separately. |
| Guide | Shows directional guidance for targets outside your current view. |
| Wide / Normal / Zoom | Changes the field-of-view mode. It does not improve the accuracy of a flight position. |
| Night | Uses a night-view palette. |
| Live / manual offset | After moving the simulated view manually, return to Live to recenter it on your phone’s orientation. |
Sky Spotter matches available flight positions to your GPS position and the phone’s orientation. It does not visually recognize aircraft in the camera image. Eligible recent positions can be projected forward; stale or unreliable positions may be hidden. Range is a search radius, not a promise that an aircraft is visible to the eye.
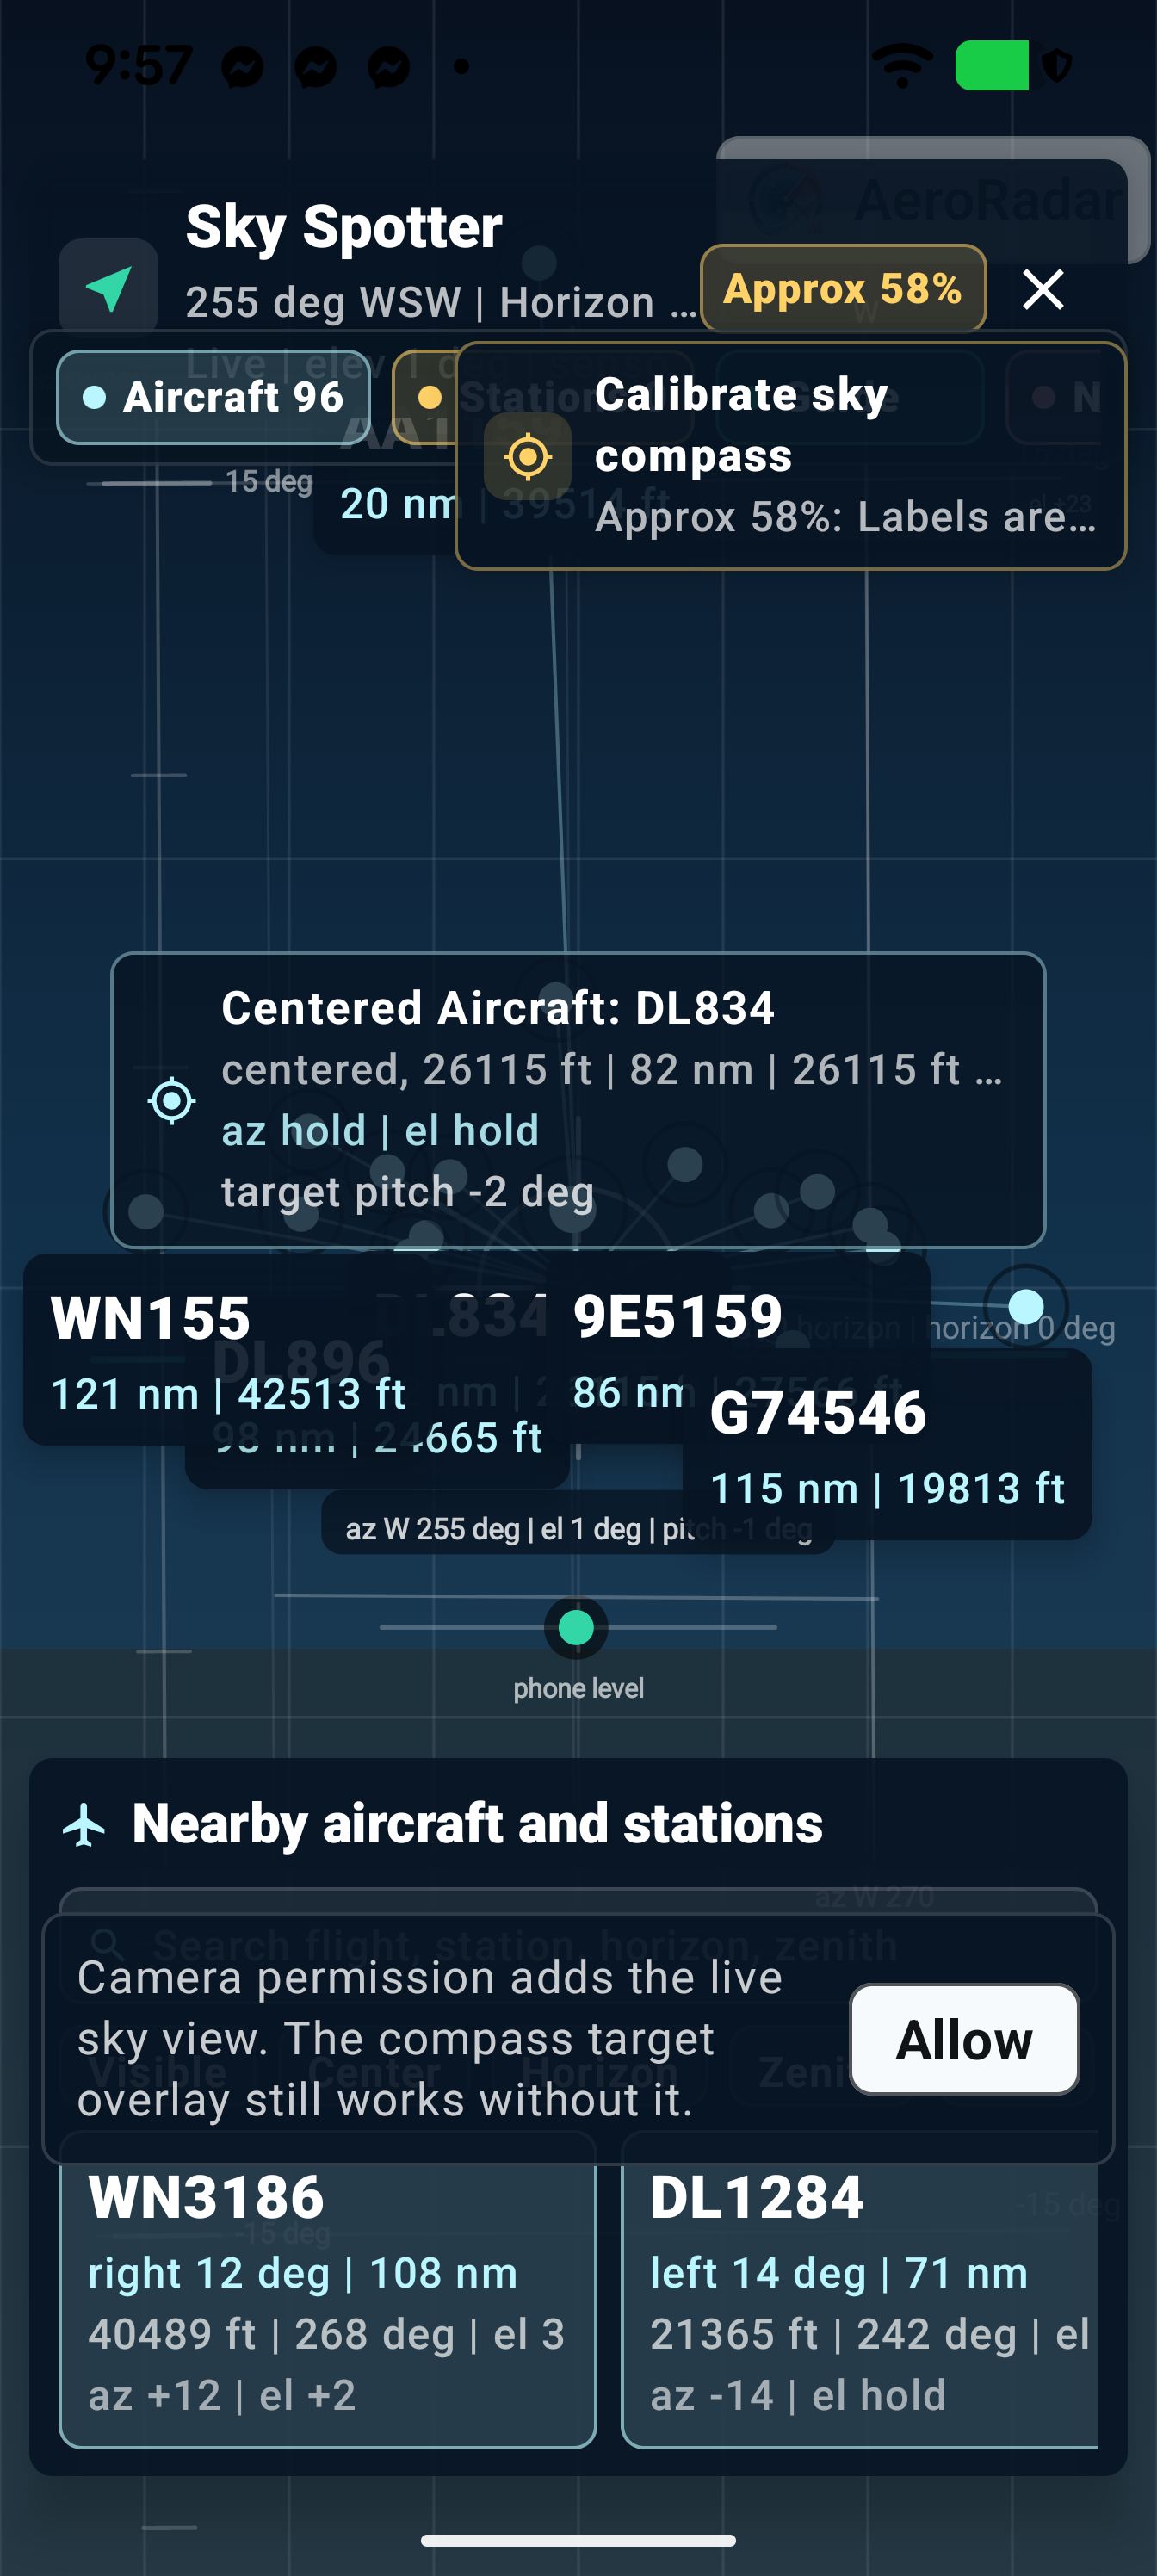
Chapter 09
Align Sky Spotter and find missing aircraft
Open Sky Spotter → status and nearby-target tray
- First confirm the live map has current aircraft. A stale feed cannot provide reliable targets in Sky Spotter.
- Check precise-location permission, location age and compass quality. Allow the device time to acquire a fresh position outdoors.
- Hold the phone upright rather than flat on a table. Near-horizontal or downward aiming can put every aircraft outside the screen.
- Use the target tray and Guide. Turn toward the indicated bearing and tilt toward the target’s elevation.
- Increase Range gradually and check that Aircraft is enabled. Turn off restrictive live filters.
- If alignment remains poor, follow the calibration prompt, remove magnetic interference and reopen Sky Spotter. Use Camera off to check the grid without the camera background.
Clouds, haze, terrain, aircraft size and altitude affect visibility. A nearby-target count can be greater than the count inside the current view. Small position or compass errors become noticeable when trying to identify one aircraft.
Chapter 10
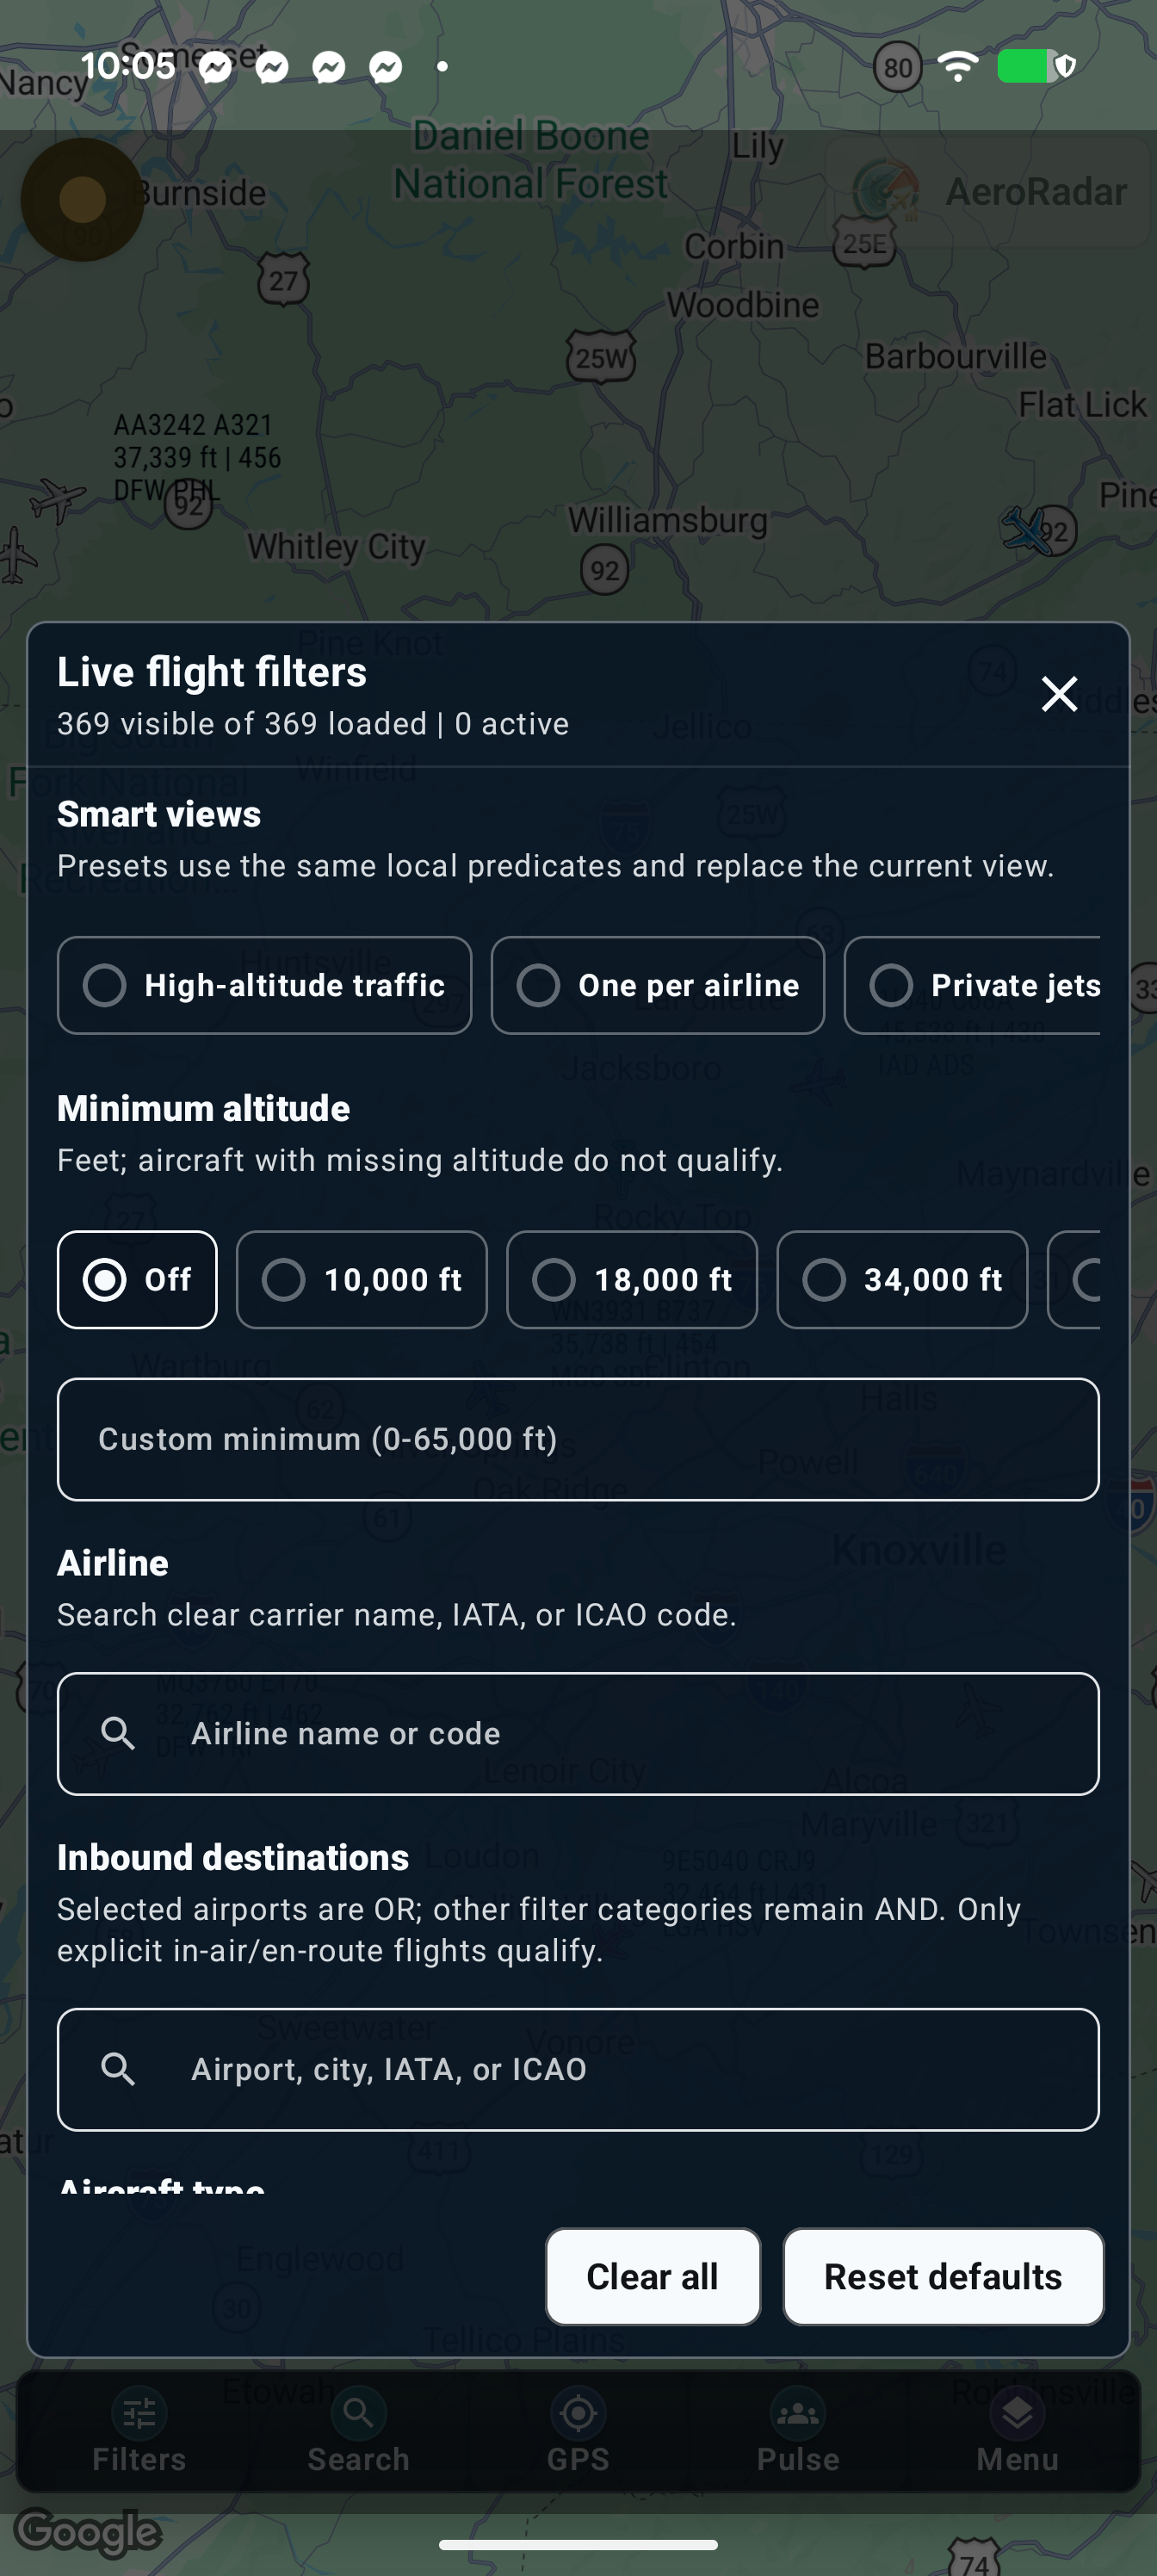
Filter live aircraft
Open Bottom toolbar → Filters
- Open Filters and read the visible-versus-loaded count.
- Choose a smart view for a quick starting point, or set individual criteria such as minimum altitude, airline/code, inbound airport and aircraft type.
- Combine criteria deliberately. Delayed only, In-air arrivals, Private/business jets and Heavy/wide-body narrow the available traffic further.
- Close the panel to inspect the result. Reopen it to relax a criterion or choose its Off/all option.
- For a reusable combination, open Settings → Advanced settings → Saved filters and aircraft references and use the saved-filter controls.
Live filters narrow loaded traffic, including supported 3D and Sky Spotter views. They do not request every matching flight worldwide. A selected flight can stay pinned even if it no longer matches; replay is separate.
Chapter 11
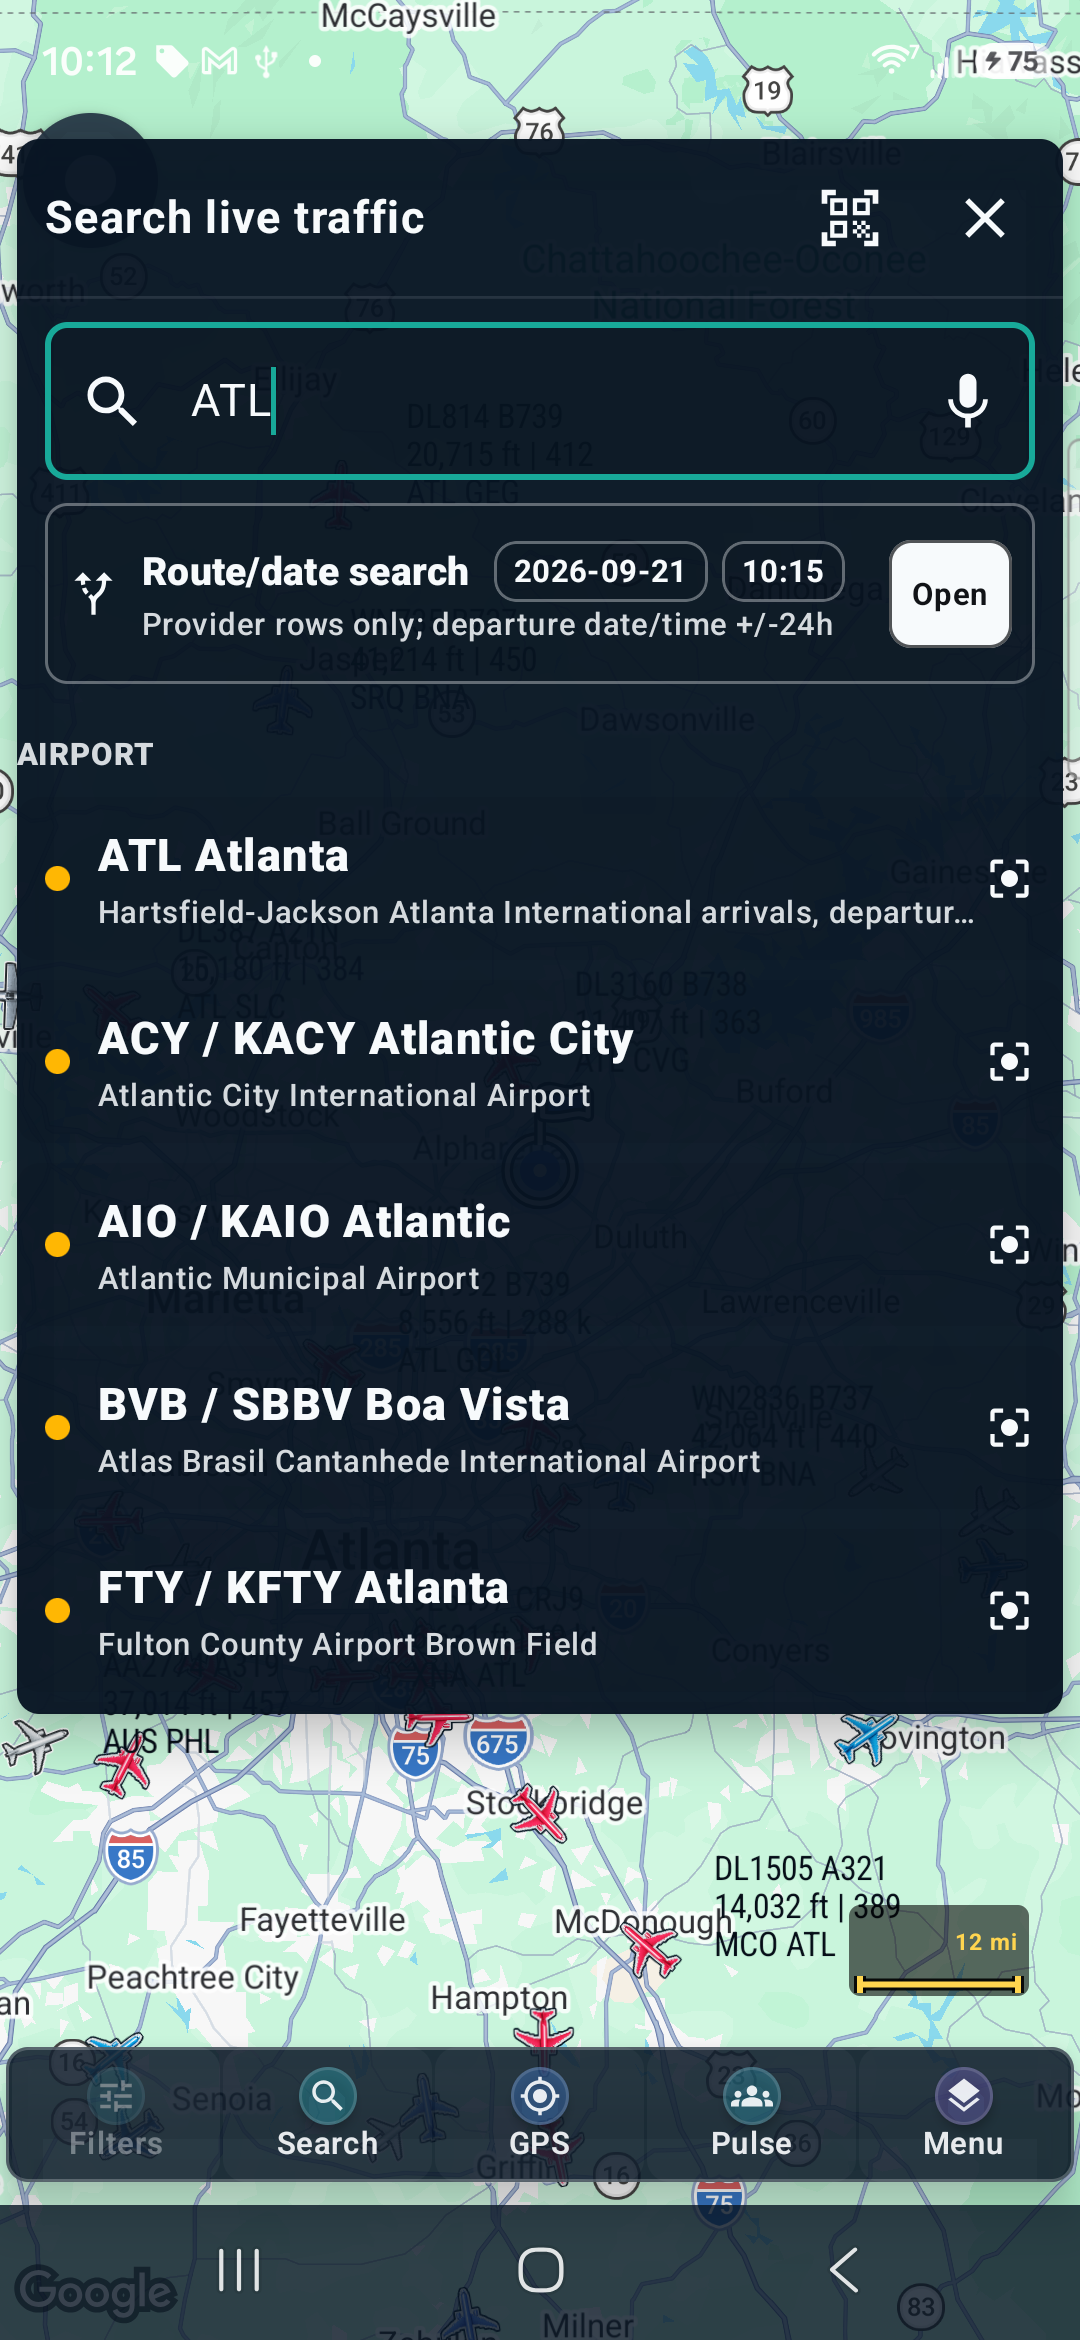
Search flights, airports and aircraft
Open Bottom toolbar → Search
- Tap Search and enter a flight number, callsign, airport name/code, airline, aircraft type, tail number or route.
- Read the result type before selecting it. An airport opens airport context; a matching live flight can focus the map; a schedule result is not proof of a live position.
- Tap the microphone for voice input and grant microphone permission if needed. Review the recognized query before selecting a result.
- Use the camera-search icon to open the supported recognition modes. Check the recognized identifier and matching result rather than assuming a perfect scan.
- Open a result to inspect its details, or clear the query and try a more specific identifier. Use available recent/saved-search entries to repeat a lookup.
Try a code such as ATL when airport names are ambiguous. Search freshness and coverage depend on the underlying data; an empty result does not prove that the flight or airport does not exist.
Chapter 12
Center the map with GPS
Open Bottom toolbar → GPS
- Tap GPS on the live map.
- Allow location access. Enable precise location when Android offers the choice and you want accurate centering or Sky Spotter alignment.
- Wait for a location fix. The map centers on the device’s available position.
- Drag away to explore another area. Tap GPS again to return.
- If centering fails, check Android location services and AeroRadar’s location permission; move to a place with better satellite reception.
The phone does not need a SIM for GPS or Wi-Fi internet access. A map center you moved manually is not a replacement for your physical observer location in Sky Spotter.
Chapter 13
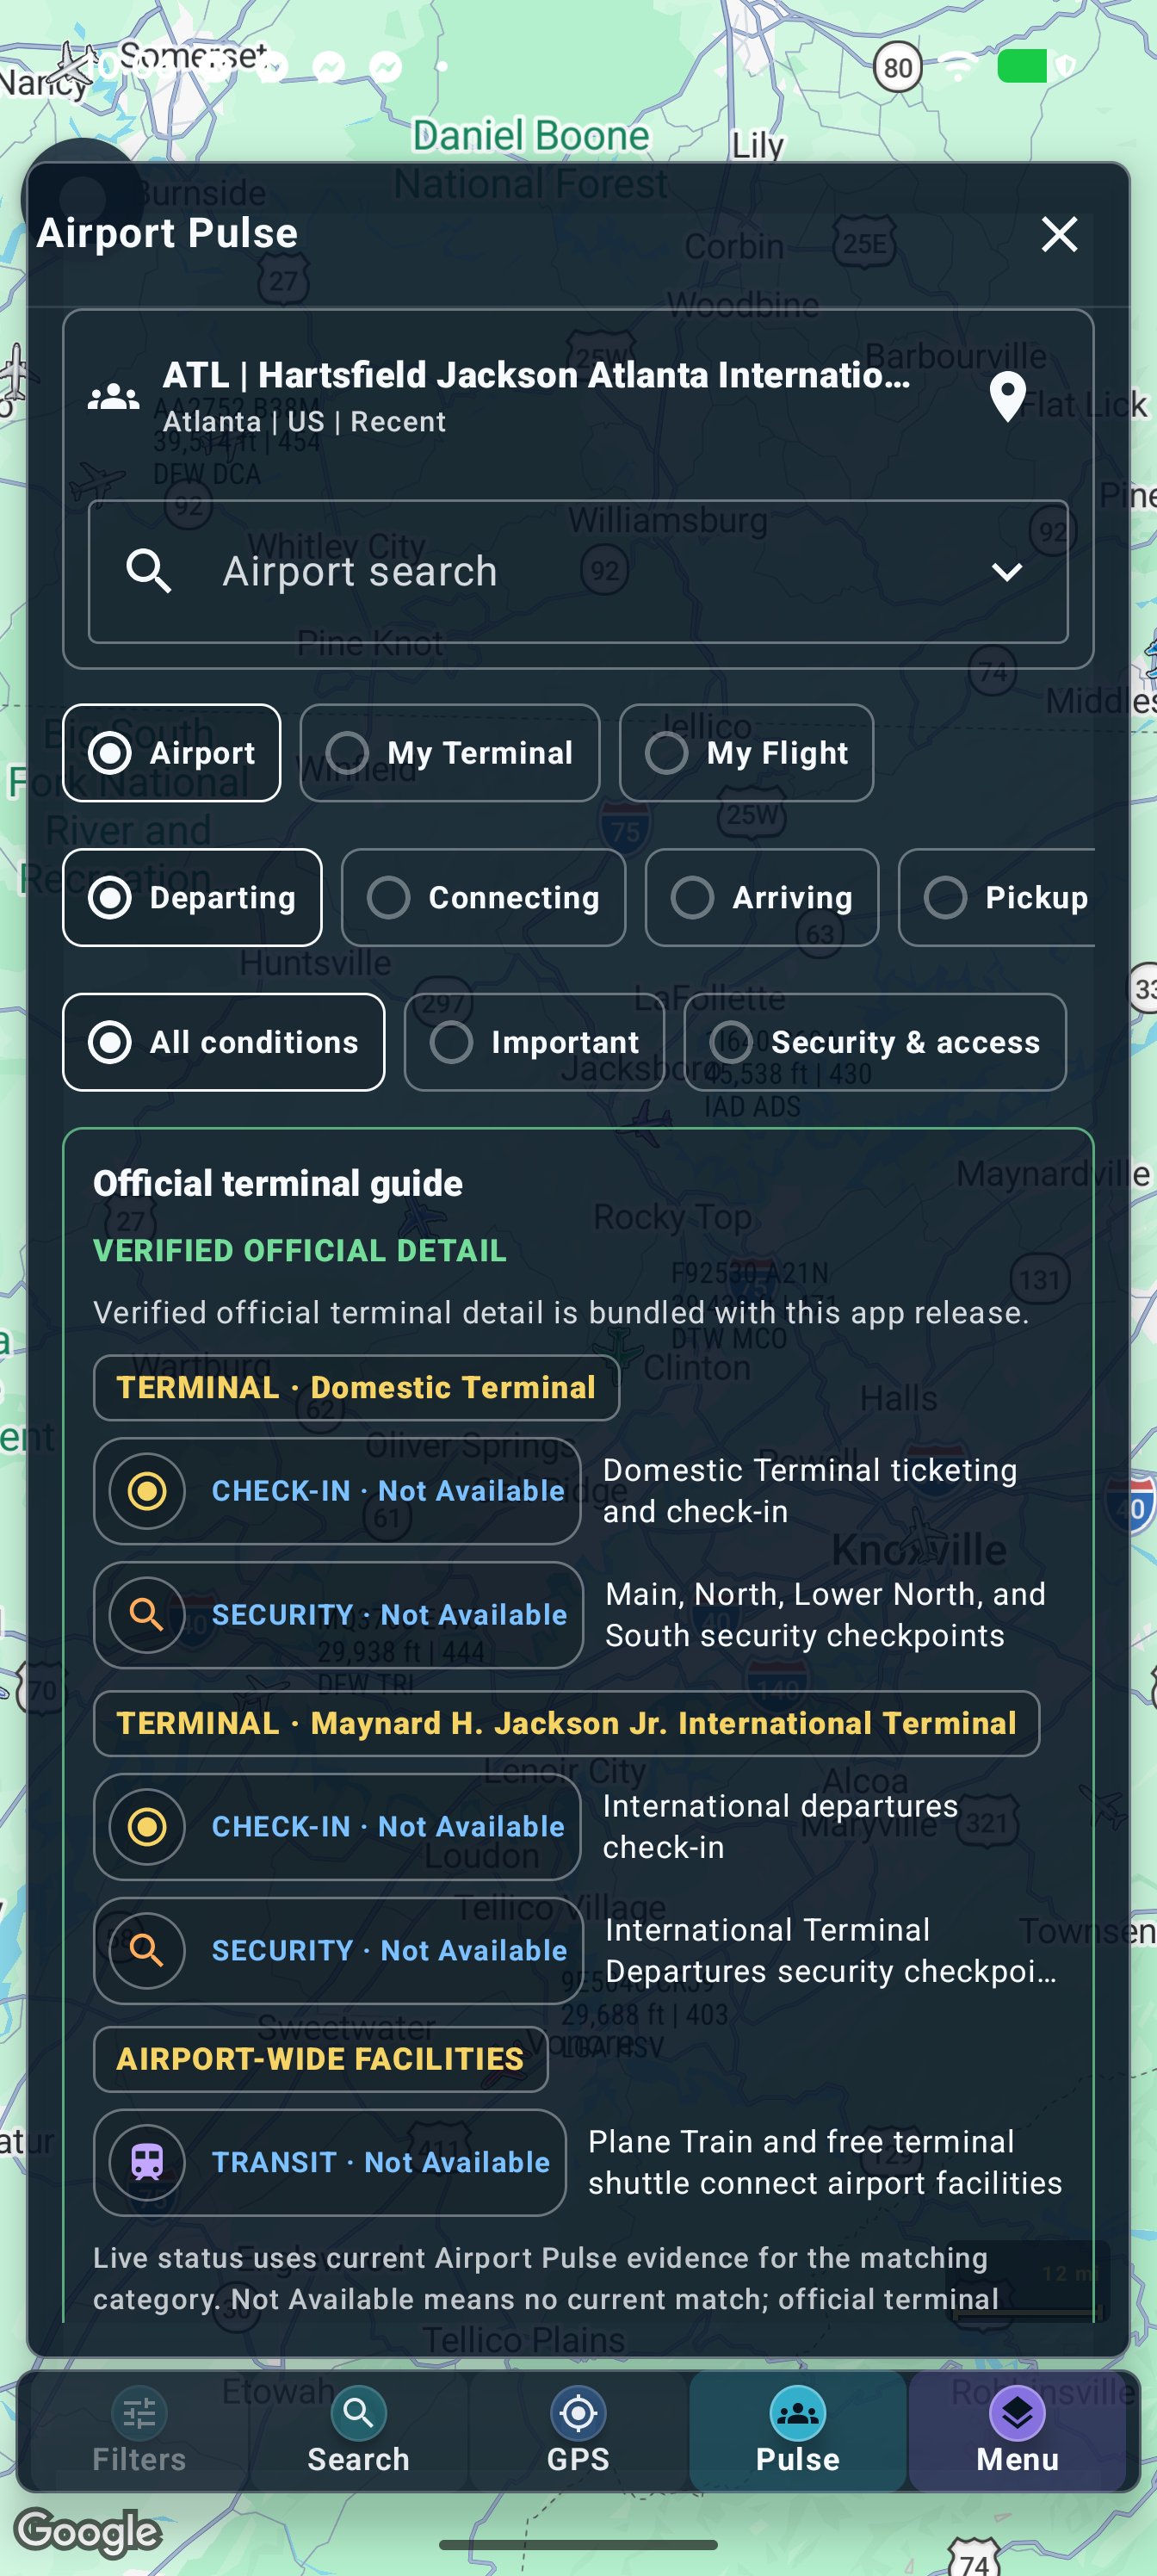
Use Airport Pulse
Open Bottom toolbar → Pulse, or Menu → Airport Pulse
- Open Pulse and choose the airport you want to inspect.
- Choose your journey context: departing, connecting, arriving or pickup.
- Switch between Airport, My Terminal and My Flight as applicable. Select a terminal or flight when prompted.
- Read terminal guidance, facilities and transport information together with each source and freshness label.
- Open the relevant condition category for more detail. Check whether it describes official facts, a current observation or a community report.
Not Available means there is no matching current evidence, not that a queue is zero minutes. A source review that has expired should be checked against the airport’s own current guidance.
Chapter 14
Read and contribute airport condition reports
Open Airport Pulse → available condition/report controls
- Choose the correct airport and journey context before reading or contributing a report.
- Read the report’s observation time and confidence. Terminal reference information and live conditions are separate.
- If a direct-report action is offered, follow its sign-in and proximity requirements; report only what you actually observed.
- For a relayed observation, choose Someone at the airport told me when available. Select the airport-level condition, describe What changed?, give its age and confirm that the other person observed it firsthand.
- Check the resulting label. Relayed firsthand reports have limited confidence and expire quickly; do not present them as official airport statements.
Some controls require verified proximity or an eligible signed-in session. Relayed reports expire after 10 minutes. Missing or disabled reporting controls do not mean a condition is normal.
Chapter 15
Use Airport Dashboard
Open Menu → Airport Dashboard
- Open Airport Dashboard and choose an airport from the directory or search.
- Select arrivals or departures, then choose Past, Today or Future when available.
- Filter the board by a flight, airline or destination/origin. Choose Time, Airline, Status or Gate to change the ordering.
- Tap a row for flight detail. Compare scheduled, estimated and actual times instead of treating them as interchangeable.
- Read source and freshness messages. Return to the directory to choose another airport.
Airport Dashboard is a flight board; Airport Pulse is terminal and traveler context. Gates, baggage and historical/future schedules appear only when supplied. Empty results can reflect data coverage.
Chapter 16
Use Airline Timetable
Open Menu → Airline Timetable
- Open Airline Timetable and select or search for an airline.
- Inspect its available live and scheduled operations. Use the offered period and direction controls to narrow the board.
- Filter for the flight or airport you need and open a matching row.
- Check the time, status and source. A scheduled operation may not yet have a live aircraft position.
Provider badges can be shown or hidden in Advanced settings → Timetable display. Hiding badges does not change the data source or its freshness.
Chapter 17
Explore delayed flights and airport delays
Open Menu → Delayed Flights or World Airport Delays
- Choose Delayed Flights for flight-level results. Narrow the displayed results with the available scope and search controls.
- Open a flight to inspect the reported delay and its schedule/actual-time context.
- Choose World Airport Delays to inspect airport-level disruption on the map.
- Select an airport or notice and read its affected area, time and source.
- Confirm your own travel plan with the airline or airport before acting on a delay display.
An airport disruption is not confirmation that every flight there is delayed. Unknown impact and no reported impact are different states.
Chapter 18
Understand operational notices and NOTAM context
Open Flight details or Airport Pulse → available notices
- Open the notices relevant to the flight or airport.
- Read the plain-language explanation alongside its source, effective time and affected location.
- Expand the original/source detail when you need to understand a restriction or event more precisely.
- If impact cannot be determined, treat it as unresolved context. An unsupported source event cannot be converted into a reliable flight-specific conclusion.
FAA NAS status, weather advisories and NOTAM information have different purposes. Simplified summaries can omit detail; official sources control, and AeroRadar is not a flight-planning or navigation instrument.
Chapter 19
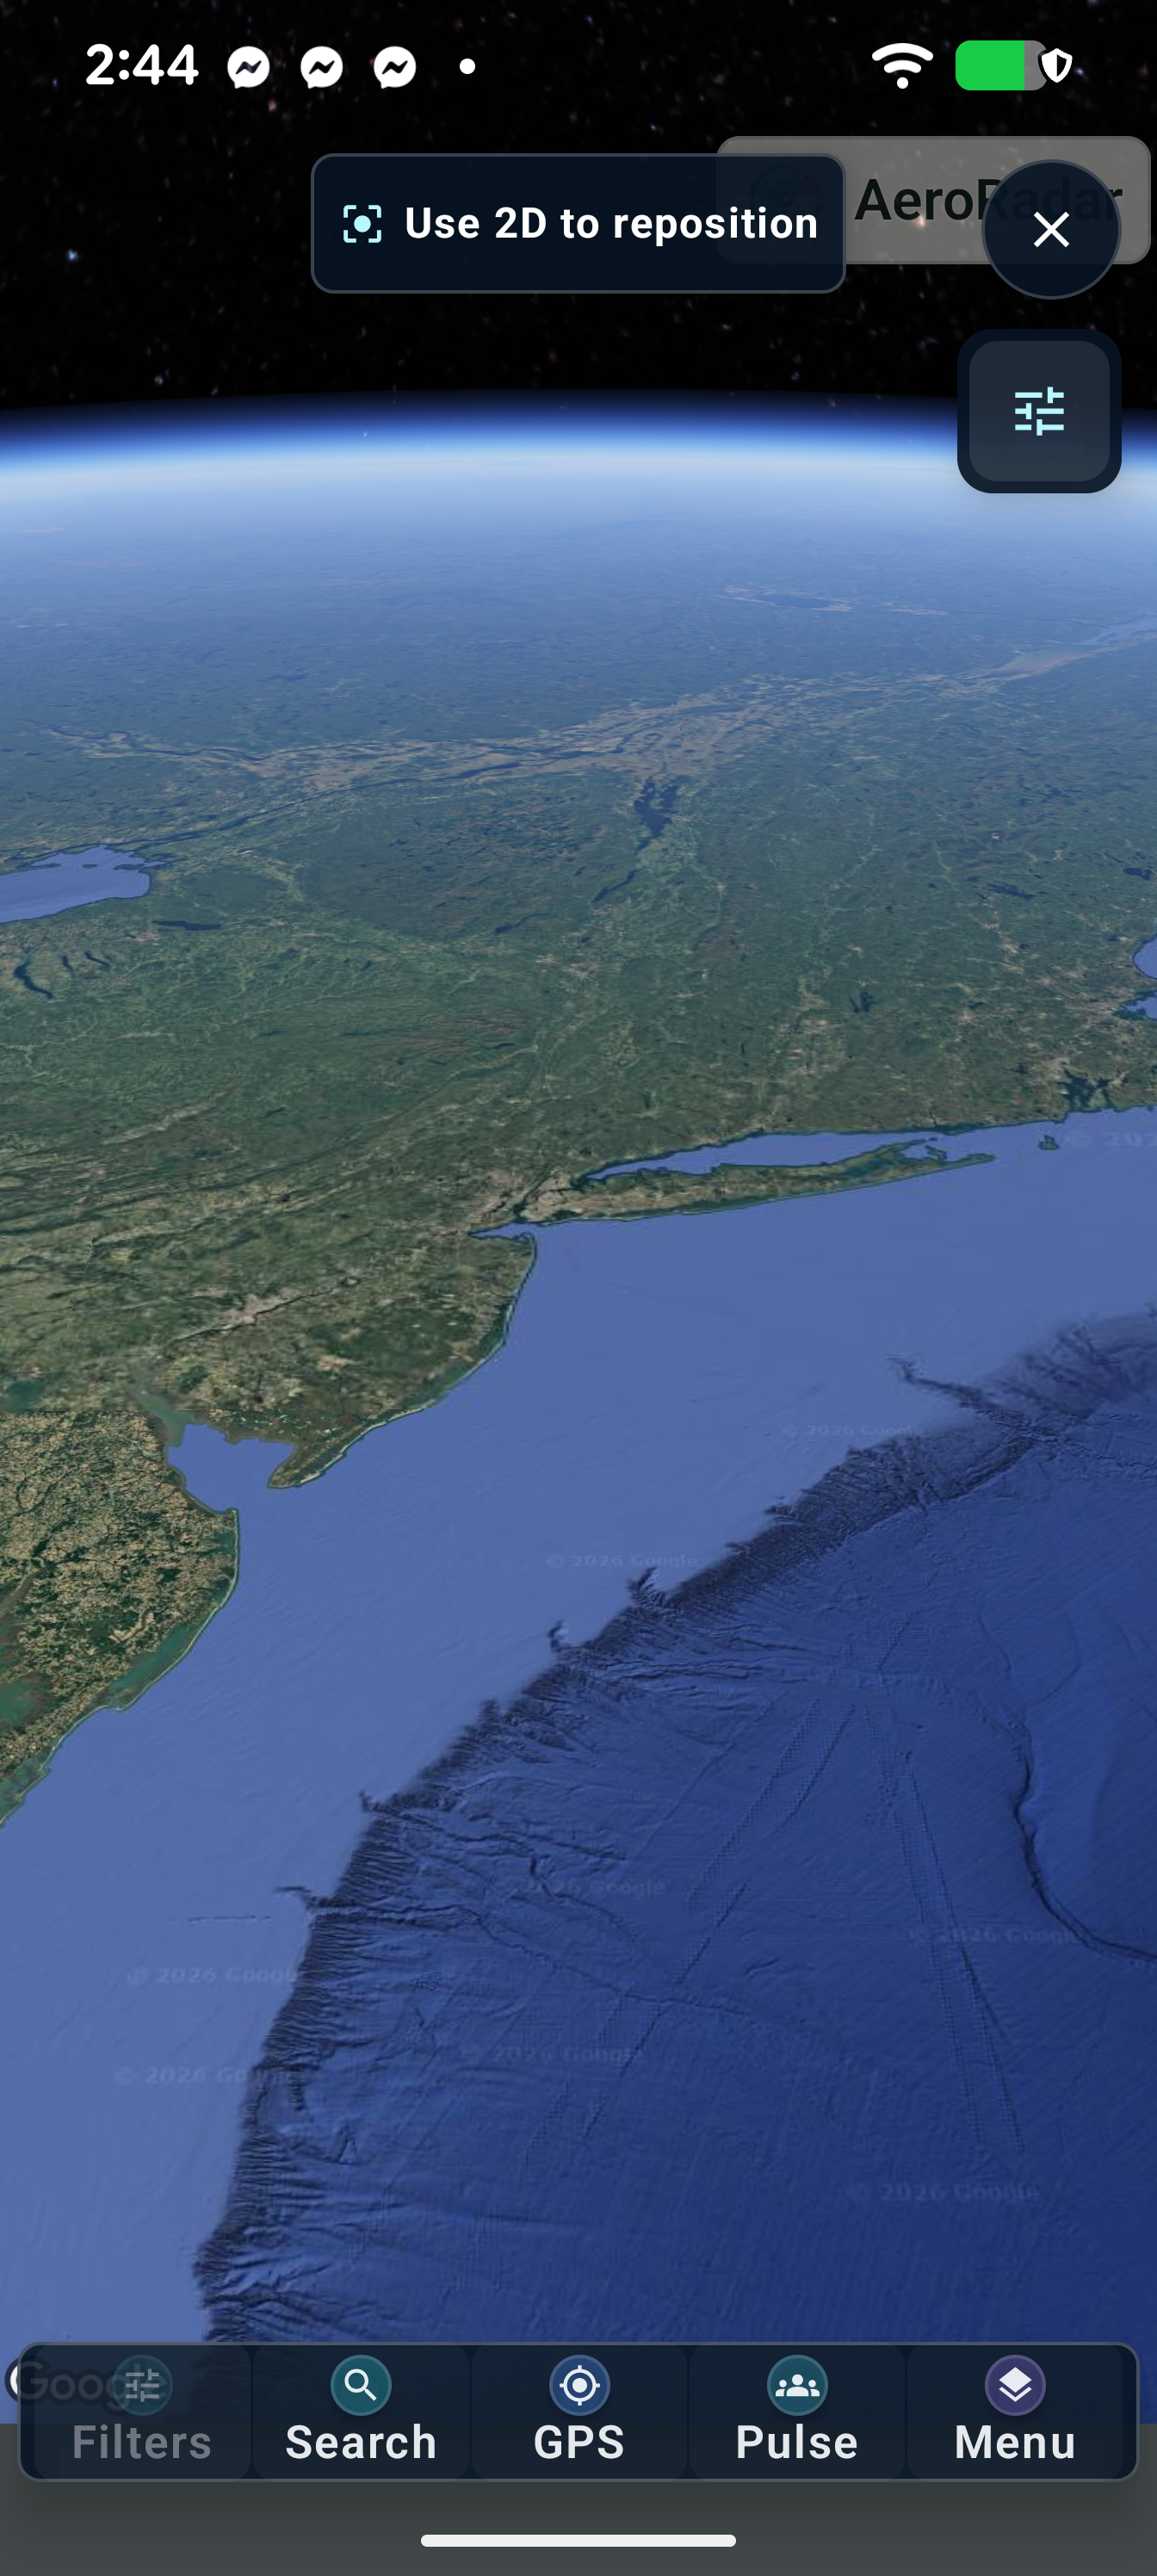
Switch to 3D Globe Radar
Open Menu → 3D Globe Radar
- Open Menu and choose 3D Globe Radar. Allow time for the globe and imagery to load.
- Pan, zoom and tilt using the on-screen controls and supported gestures. Collapse the control strip when you want more of the globe visible.
- Select an aircraft to inspect its flight and elevated path. Use flight replay when history is available.
- At close range, use Move map when offered to choose a new center without relying on aircraft following.
- Configure 3D layers in Settings → Map and display → 3D Maps. Return through Menu → 2D Map Radar.
3D needs a capable device and a working imagery connection. Flight altitude visualization changes drawing scale, not the measured altitude readout. If the globe is slow or fails, return to 2D and check the app/device update and support guidance.
Chapter 20
Track flights and set alerts
Open Flight details → tracking action; Menu → Tracked Flights
- Open a flight’s details and use its tracking control.
- Open Menu → Tracked Flights to revisit it. Select the saved flight to focus it or edit its tracking options.
- Enable the alert groups you want for the tracked aircraft. Tracking alone does not guarantee that push triggers are enabled.
- Use Settings → Alerts to inspect rule coverage, quiet hours and recent activity.
- Remove a tracked entry when you no longer want it in your list. This does not cancel an airline booking.
A saved entry can outlive a live flight position. Alert delivery depends on enabled rules, relevant source events, app/server availability and Android notification permission.
Chapter 21
Revisit history and saved searches
Open Menu → History; Search → available recent/saved entries
- Open History to revisit recorded interactions and available replay links.
- Expand Clicked plane history to see aircraft previously opened from Live Radar.
- Use an entry’s open or search action to revisit it. A historical entry does not promise the same flight is still live.
- Use the entry’s delete action if you want to remove it from that history.
- In Search, reuse an available saved or recent query to perform a fresh lookup.
History of what you opened and the server’s retained flight-position history are different. Removing a clicked-plane entry does not delete the flight’s public observations.
Chapter 22
Navigate Settings
Open Menu → Settings
- Open Menu → Settings. Choose Map and display for everyday appearance and layer controls.
- Choose Alerts for notifications or Account & Security for your account and access.
- Scroll down for Diagnostics, App version, Help / how to and Advanced settings.
- Enable Remember my place in Settings if you want to reopen the same section. Use Reset remembered location to clear that navigation preference.
- Return with the Back arrow, or close the panel to see the map.
Some older builds also list Features and functionality. Availability, button layout and text size can vary by version; use the chapter links below to find the relevant control.
Chapter 23
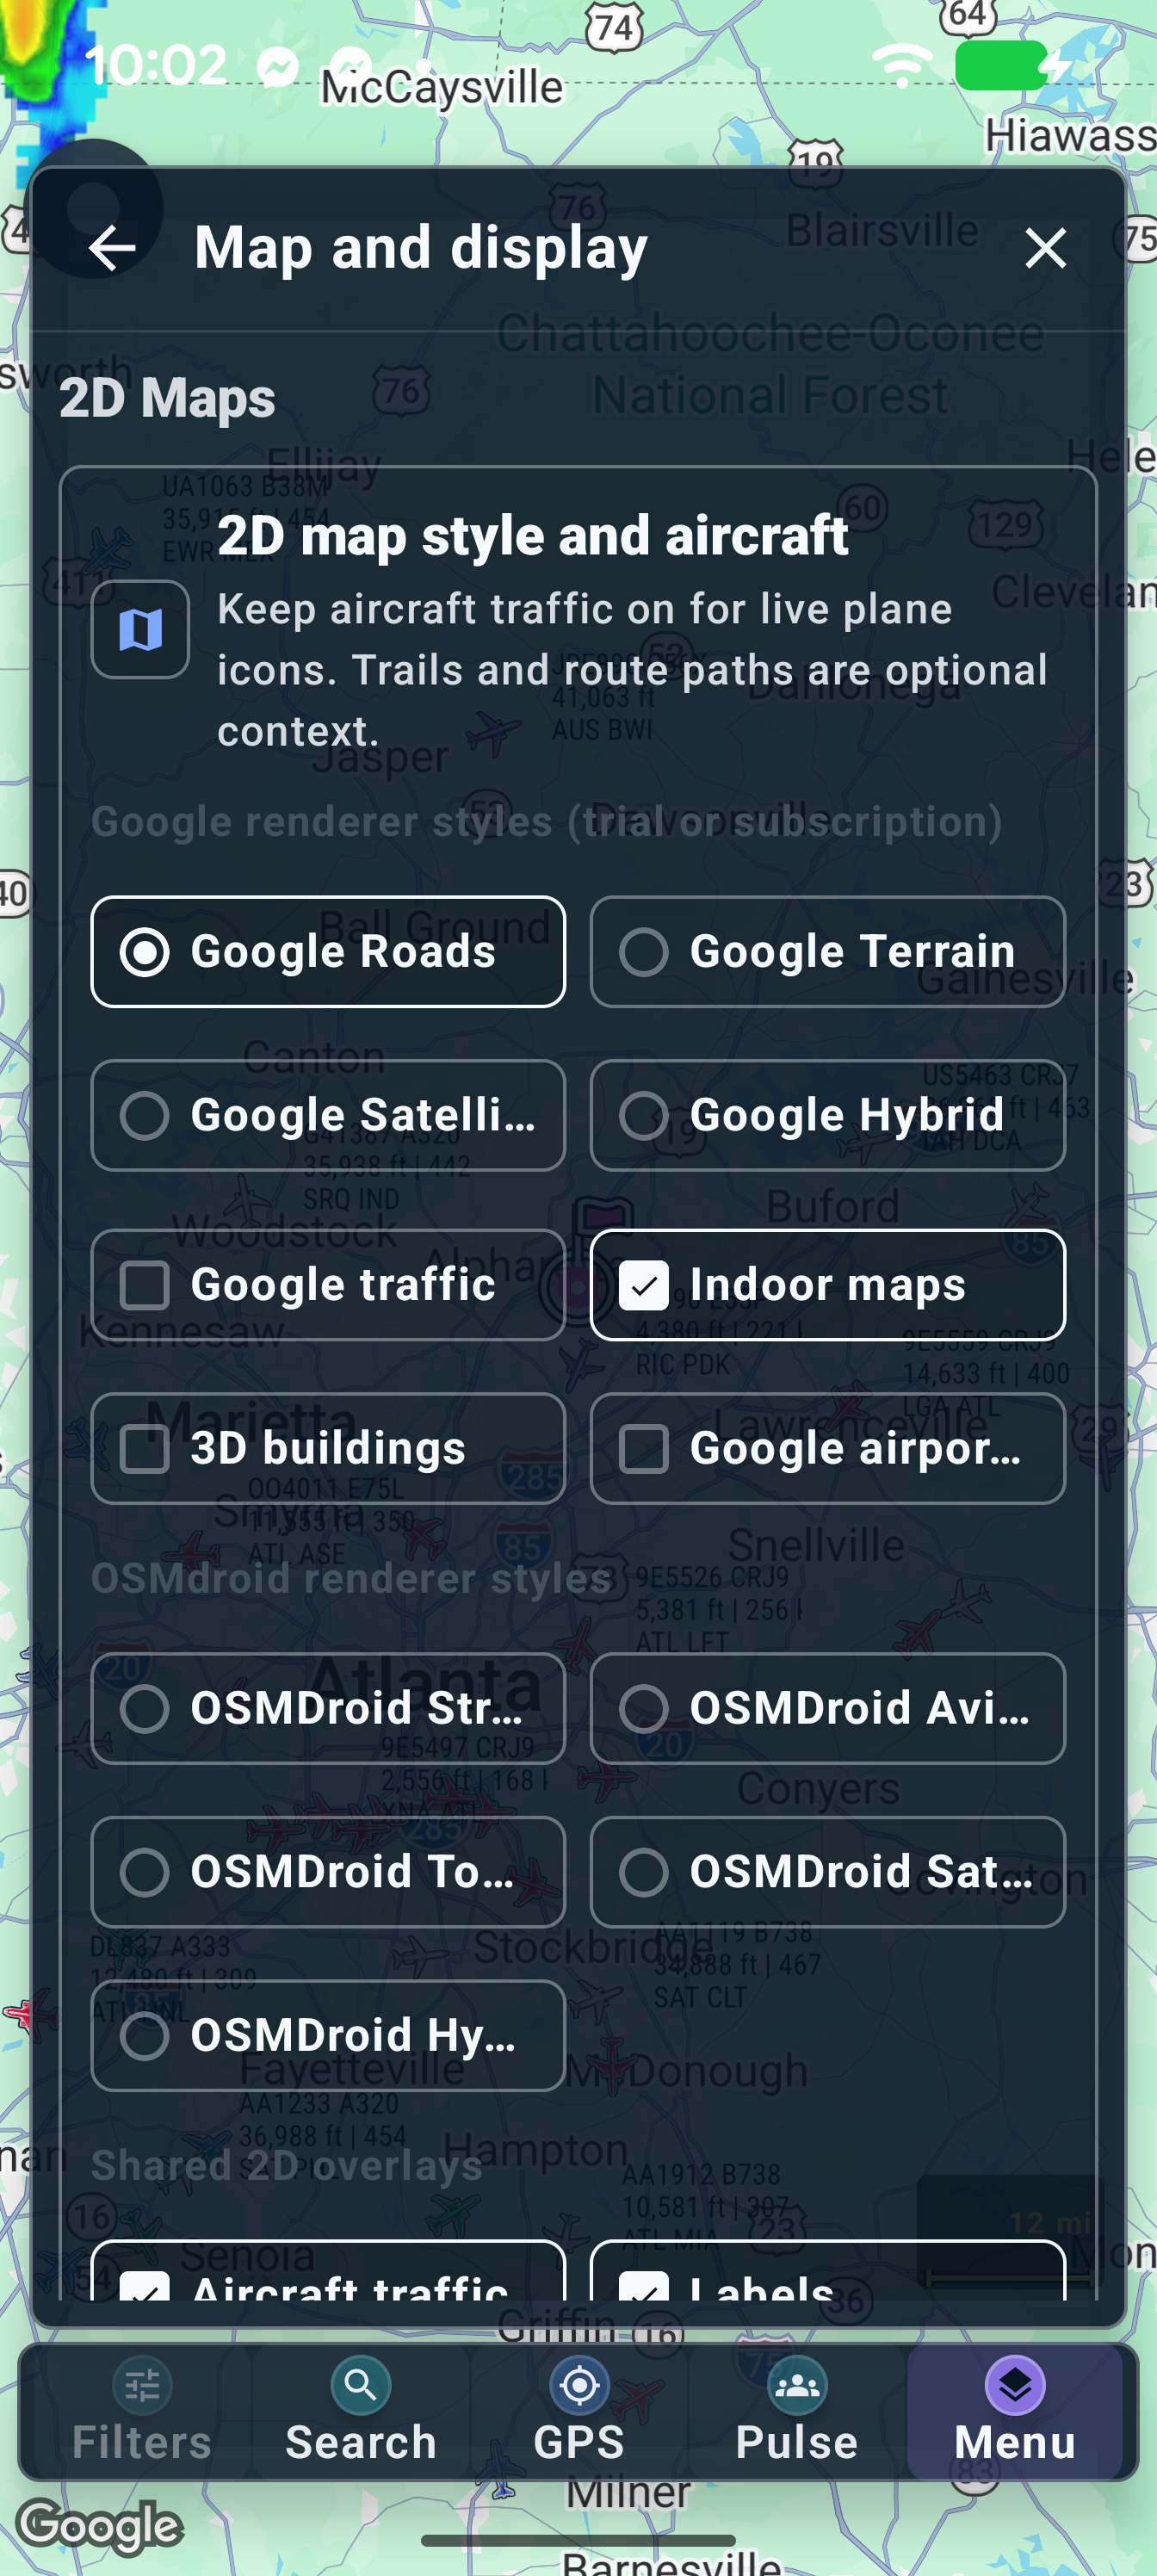
Set 2D map style, labels and overlays
Open Settings → Map and display → 2D Maps
- Choose a map style in 2D map style and aircraft. Google options include Roads, Terrain, Satellite and Hybrid; the app also lists available OSMdroid styles.
- Enable Aircraft traffic to show aircraft. Use Labels to control their text.
- Turn Flight trails, Route paths and Airport markers on or off independently.
- Use Google traffic for road traffic, Indoor maps for available building interiors, 3D buildings for supported map buildings, and Google airport badges for airport context.
- Close Settings to inspect the result. If a layer is unavailable, check the selected renderer and access/provider message.
A 2D renderer’s 3D buildings switch is different from the full 3D Globe Radar view.
Chapter 24
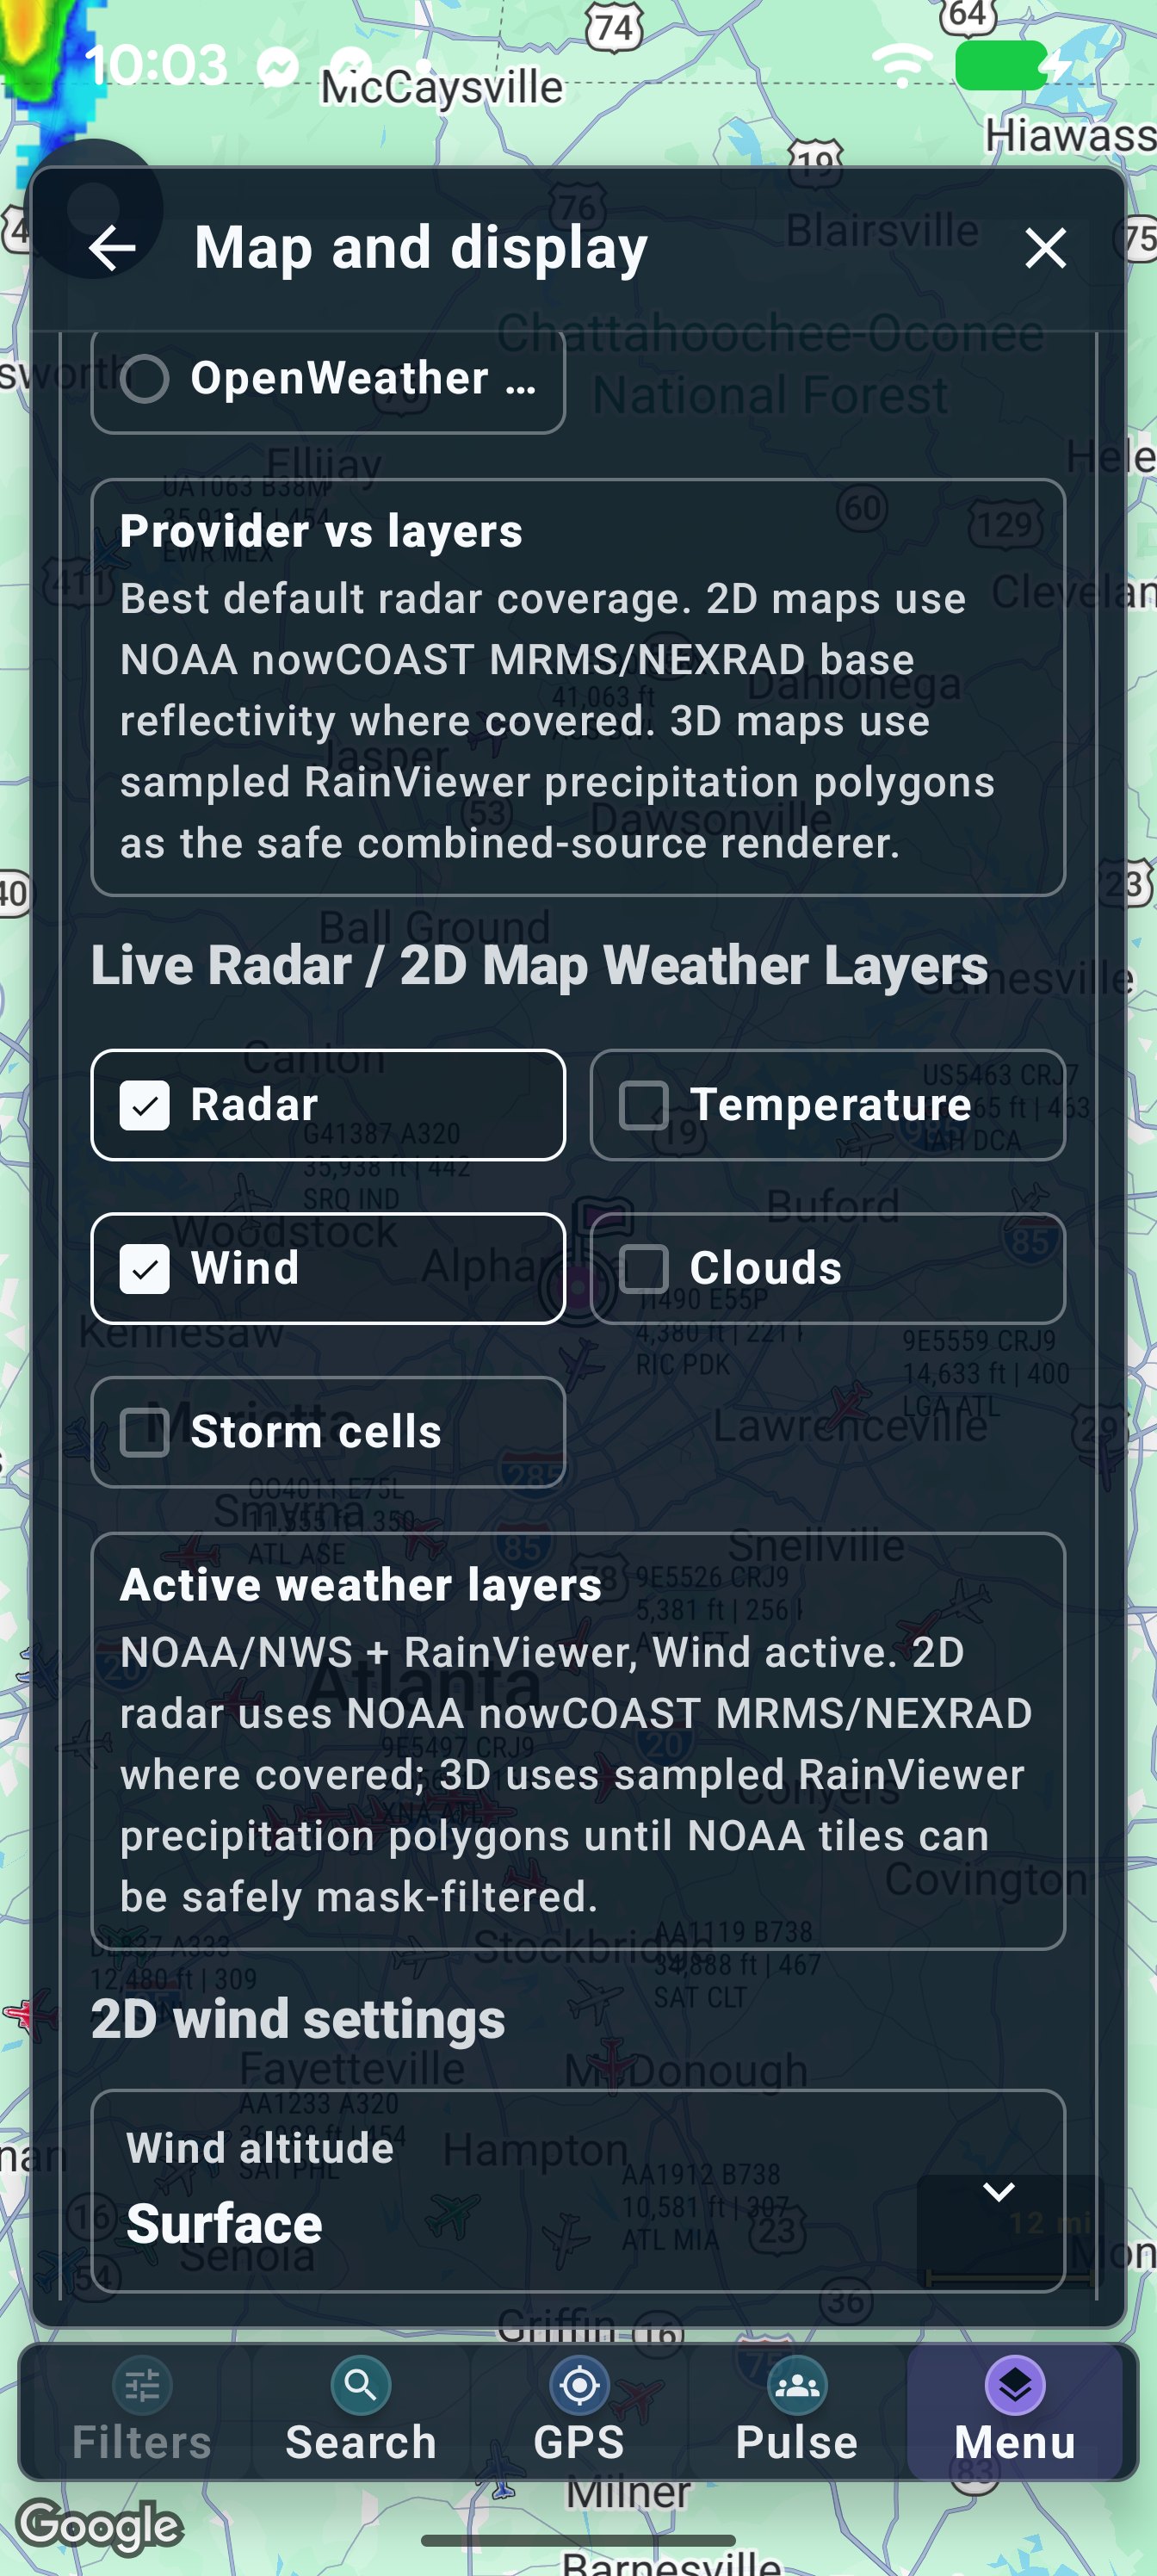
Enable weather layers
Open Settings → Map and display → 2D Maps – Weather or 3D Maps
- Choose the weather provider offered for the view you are using. Read its availability status before selecting it.
- Enable the individual layers you want: Radar, Temperature, Wind, Clouds or Storm cells, where available.
- For wind, choose the altitude and detail options you need; surface wind and wind aloft describe different conditions.
- Return to the map, inspect the weather legend and timestamp, and turn layers off individually if they obscure aircraft.
- Set up 3D weather separately in the 3D section. Its rendering and coverage can differ from 2D.
Choosing a provider does not automatically enable every layer. A provider marked key missing or unavailable cannot supply that layer. Weather can be delayed or outside coverage; absence of a graphic does not prove clear conditions.
Chapter 25
Set 3D layers, units and language
Open Settings → Map and display → 3D Maps / Display
- Scroll to 3D Maps and open the globe layer/altitude controls.
- Choose the aircraft traffic, flight paths, flight trails and airport markers you want visible.
- Adjust Flight altitude visualization when available to improve the visible separation of paths. Actual altitude values remain unchanged.
- Scroll to Units and language. Set Language, Units and Temperature to the offered preferences.
- Return to a flight or weather view and check the unit labels before comparing numbers.
Changing display units does not change a data source’s accuracy or create information that was not supplied.
Chapter 26
Understand aircraft icons and colors
Open Settings → Map and display → Aircraft marker color guide
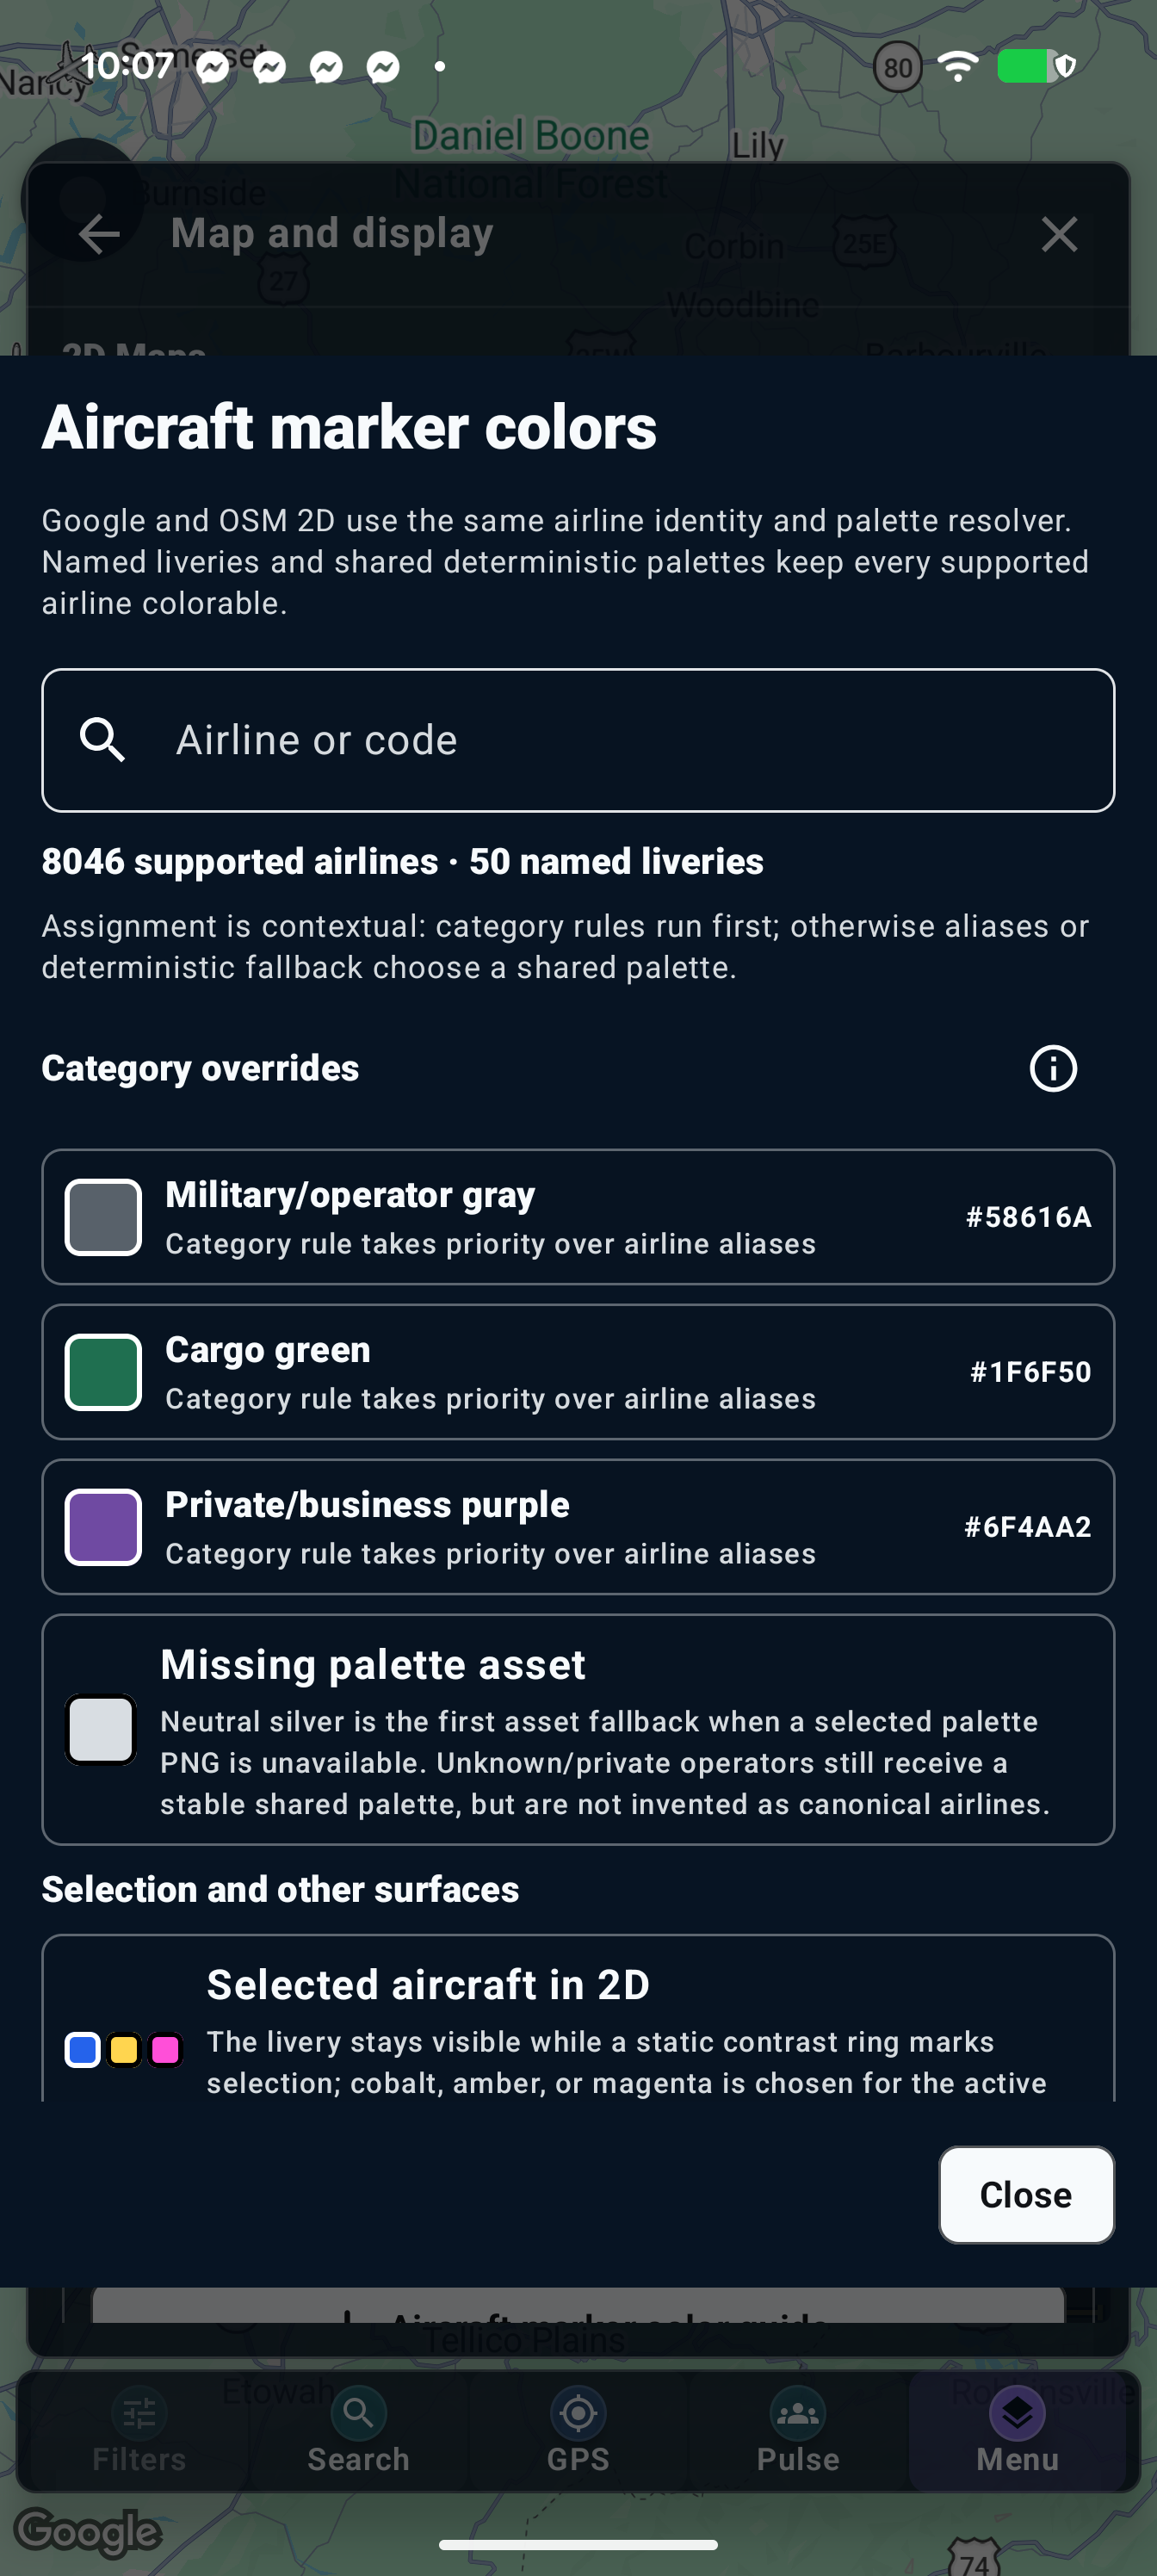
- Open the Aircraft marker color guide from the shared 2D overlays section.
- Search an airline name or code to inspect its available palette.
- Compare the guide with the aircraft’s shape and flight details when identifying it on the map.
- Read category and fallback explanations. Different operators can share colors, and selection rings or route accents are separate from airline colors.
A color is a visual aid, not a unique airline identifier or a warning by itself.
Chapter 27
Use Advanced settings and choose your start screen
Open Settings → Advanced settings
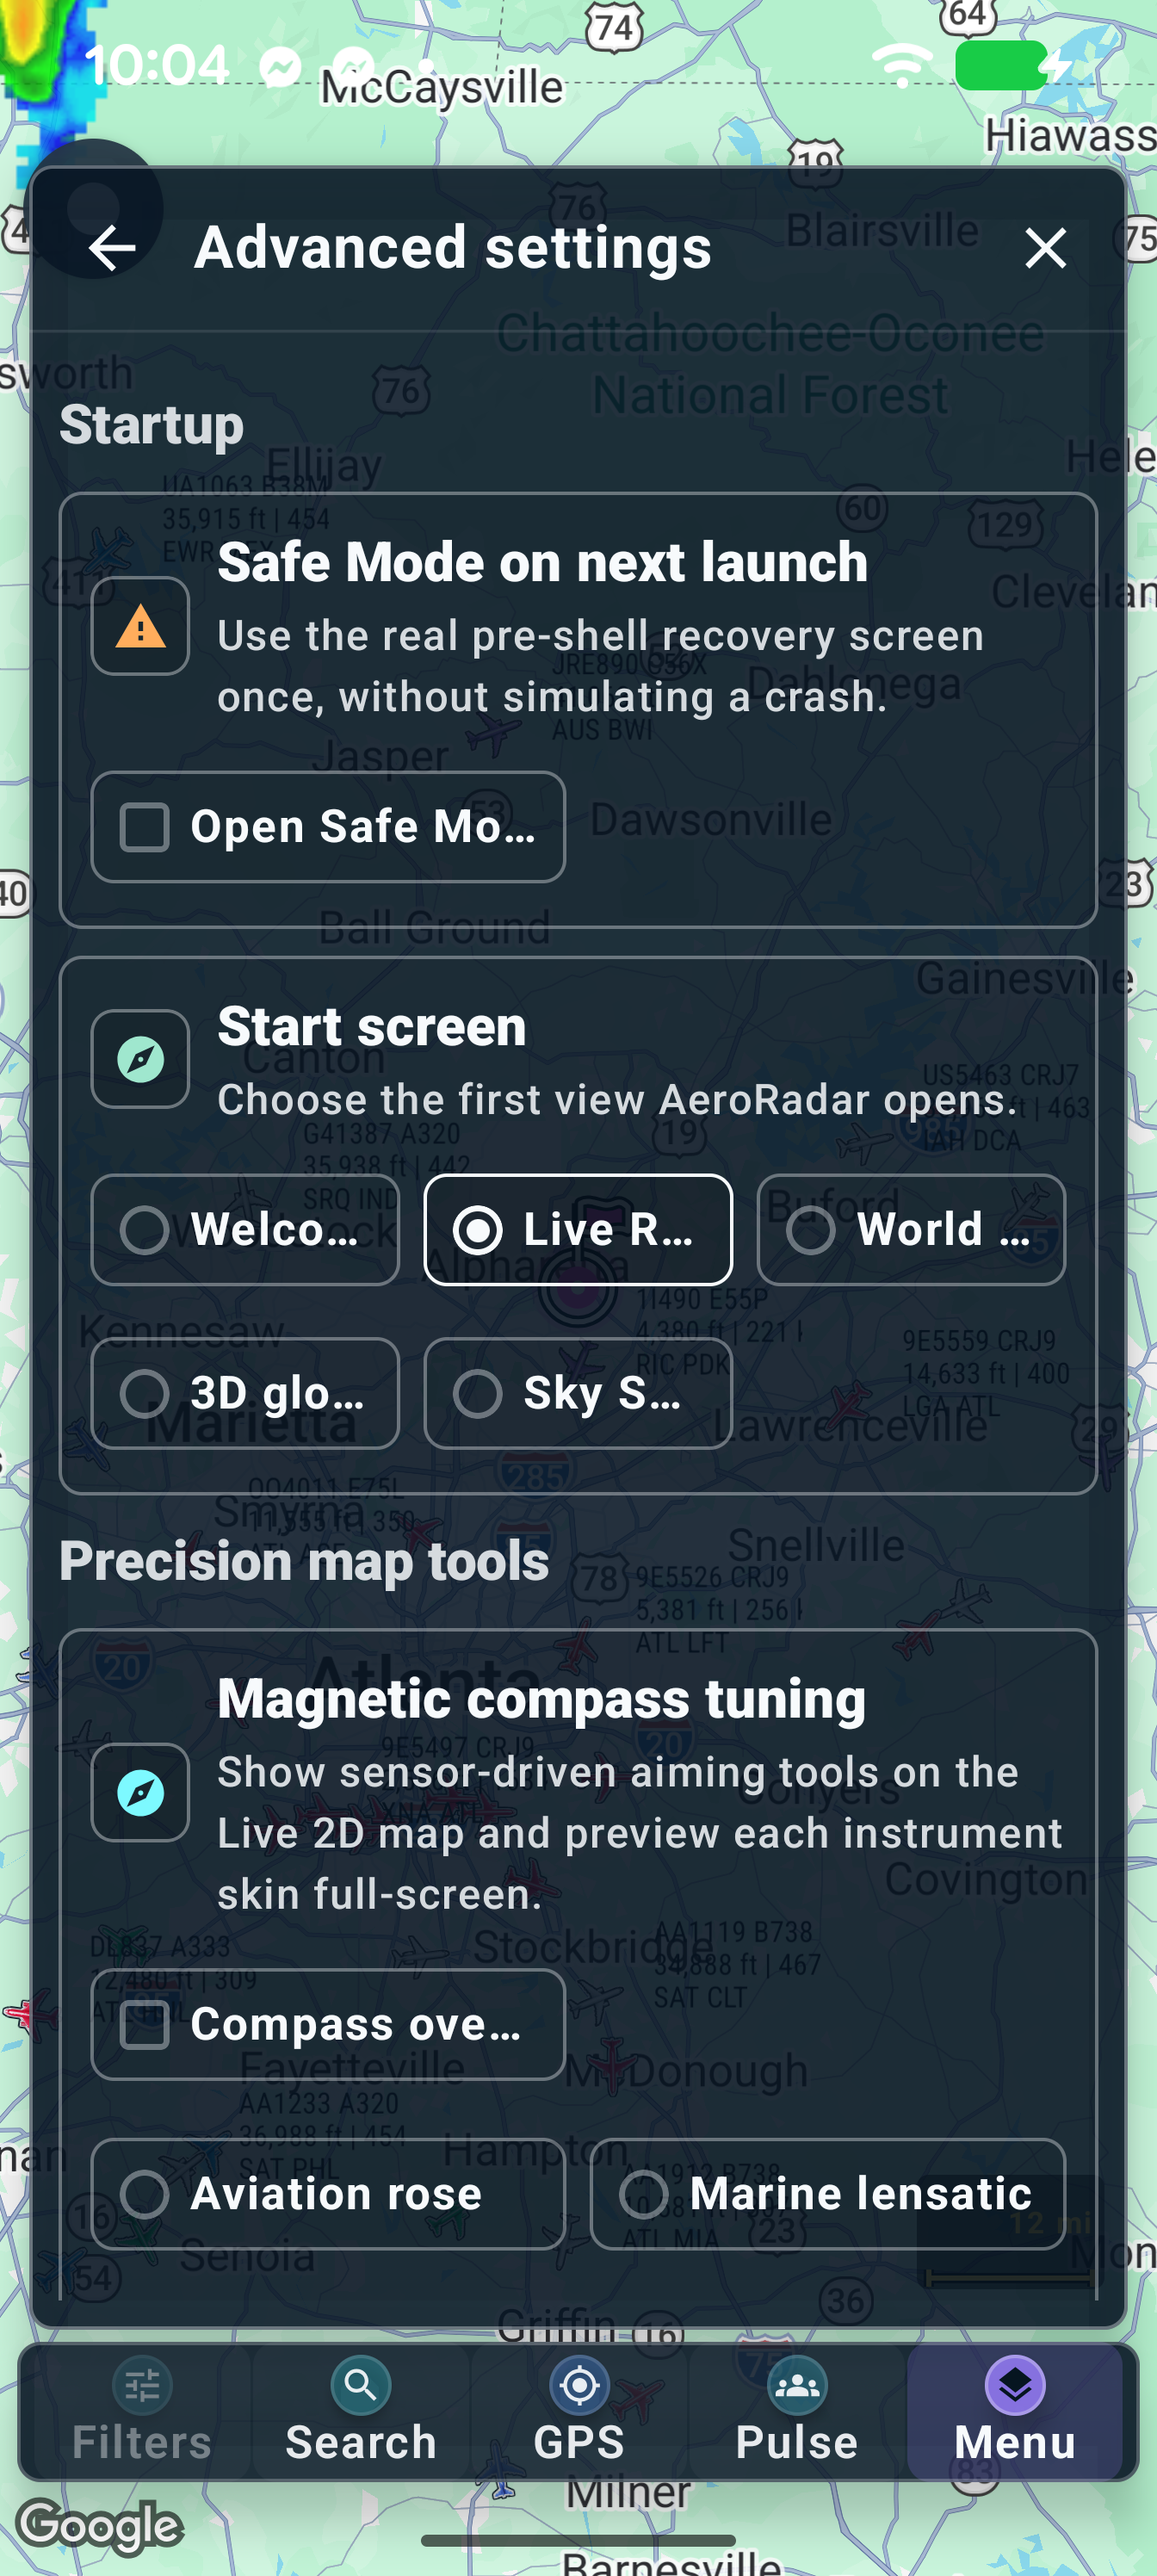
- Open Advanced settings and scroll to Startup.
- Choose a Start screen: Welcome / product tour, Live Radar: My Location, World map, 3D globe or Sky Spotter.
- Use Open Safe Mode once only when you want the recovery screen on the next launch. It does not simulate a crash.
- Continue scrolling for Precision map tools, Advanced Live Radar add-ons, Timetable display, Aircraft filters, Airspace and hazards, Panel and legend tuning, and Saved filters and aircraft references.
- Change one relevant control and return to the affected view to see its effect.
Advanced settings collects controls used less often; everyday map, alerts and account options have their own Settings sections.
Chapter 28
Use the magnetic compass overlay and full screen
Open Settings → Advanced settings → Magnetic compass tuning
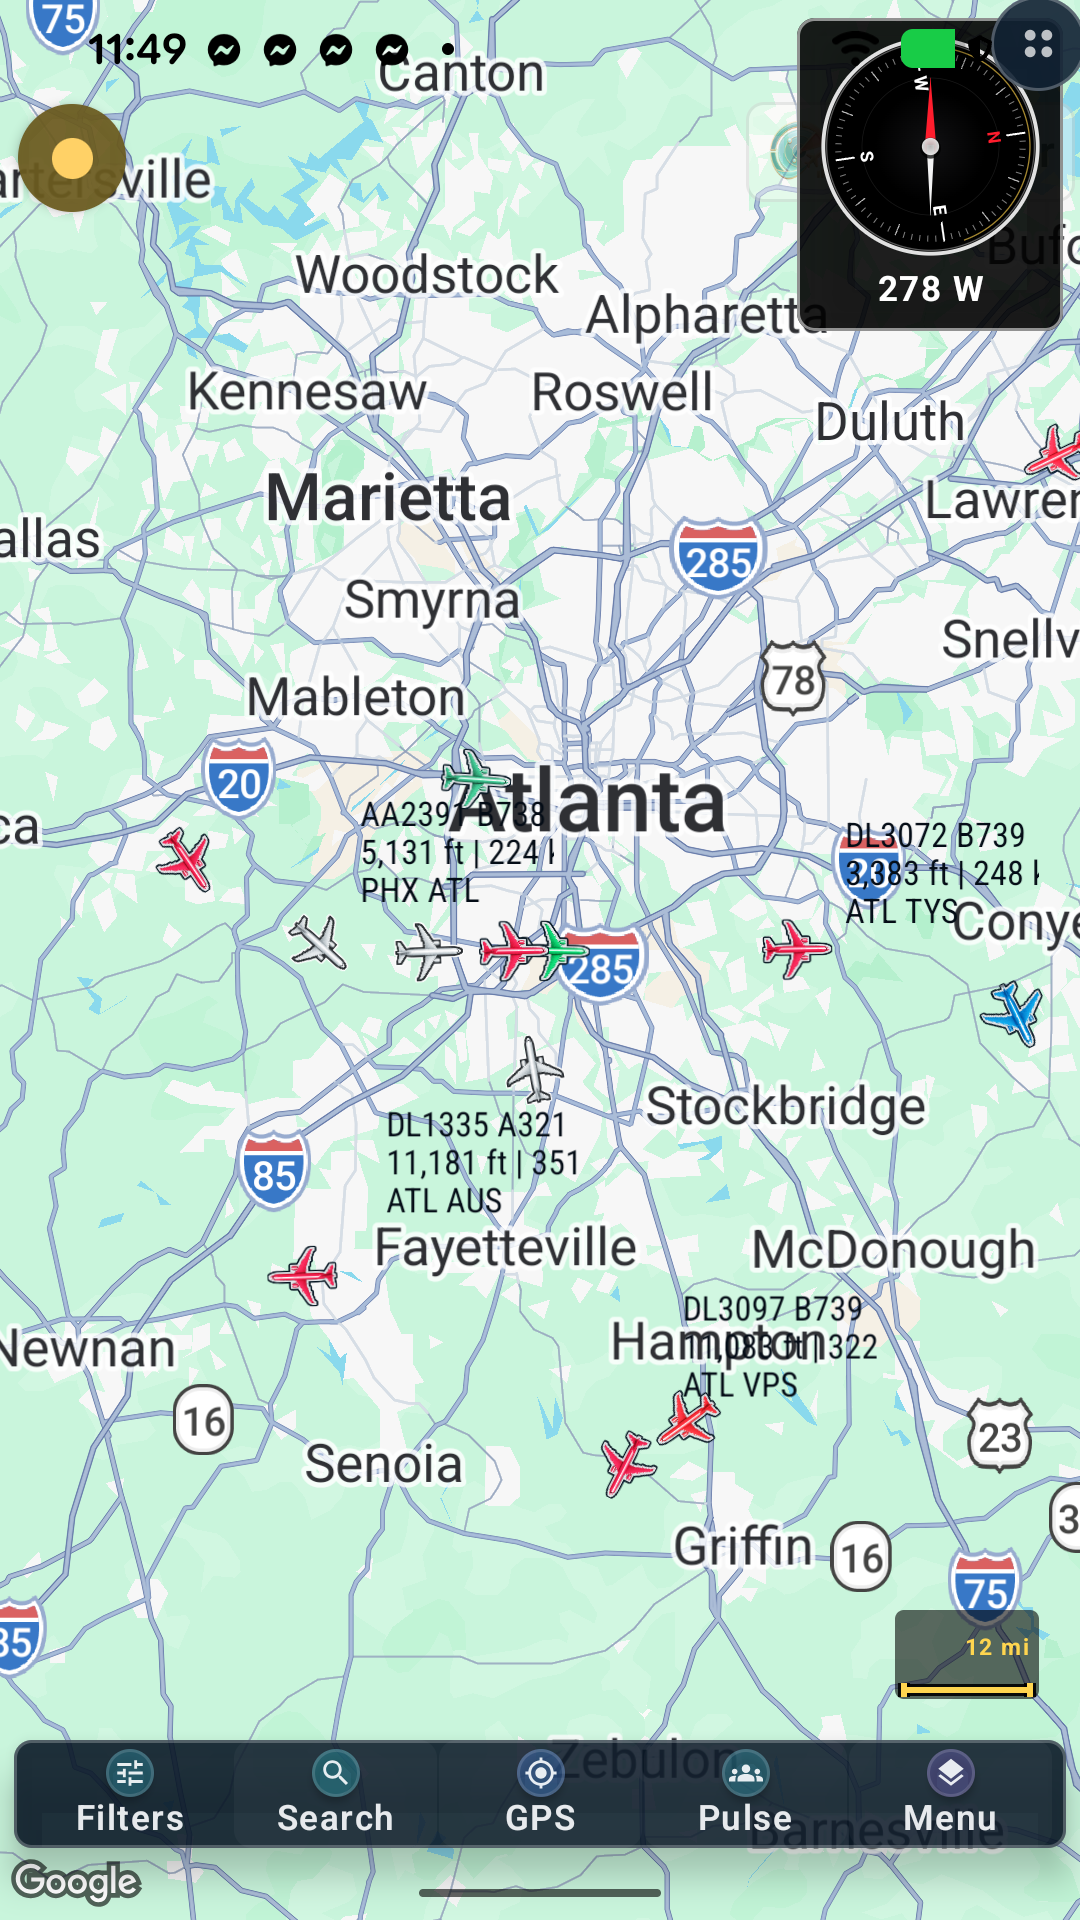
- Enable Compass overlay to show the instrument on the live 2D map.
- Choose an instrument skin and Compass motion style.
- Set Compass size: Tiny, Compact, Small, Medium or Large.
- Open Full screen Compass when you want the dedicated instrument view, then return to the map.
- Follow calibration guidance and keep the device away from magnetic interference. Turn Compass overlay off when you want a clearer map.
The map compass overlay and Sky Spotter’s Compass switch are separate controls.
Chapter 29
Explore compass skins in full screen
Open Advanced settings → Magnetic compass tuning → Full screen Compass
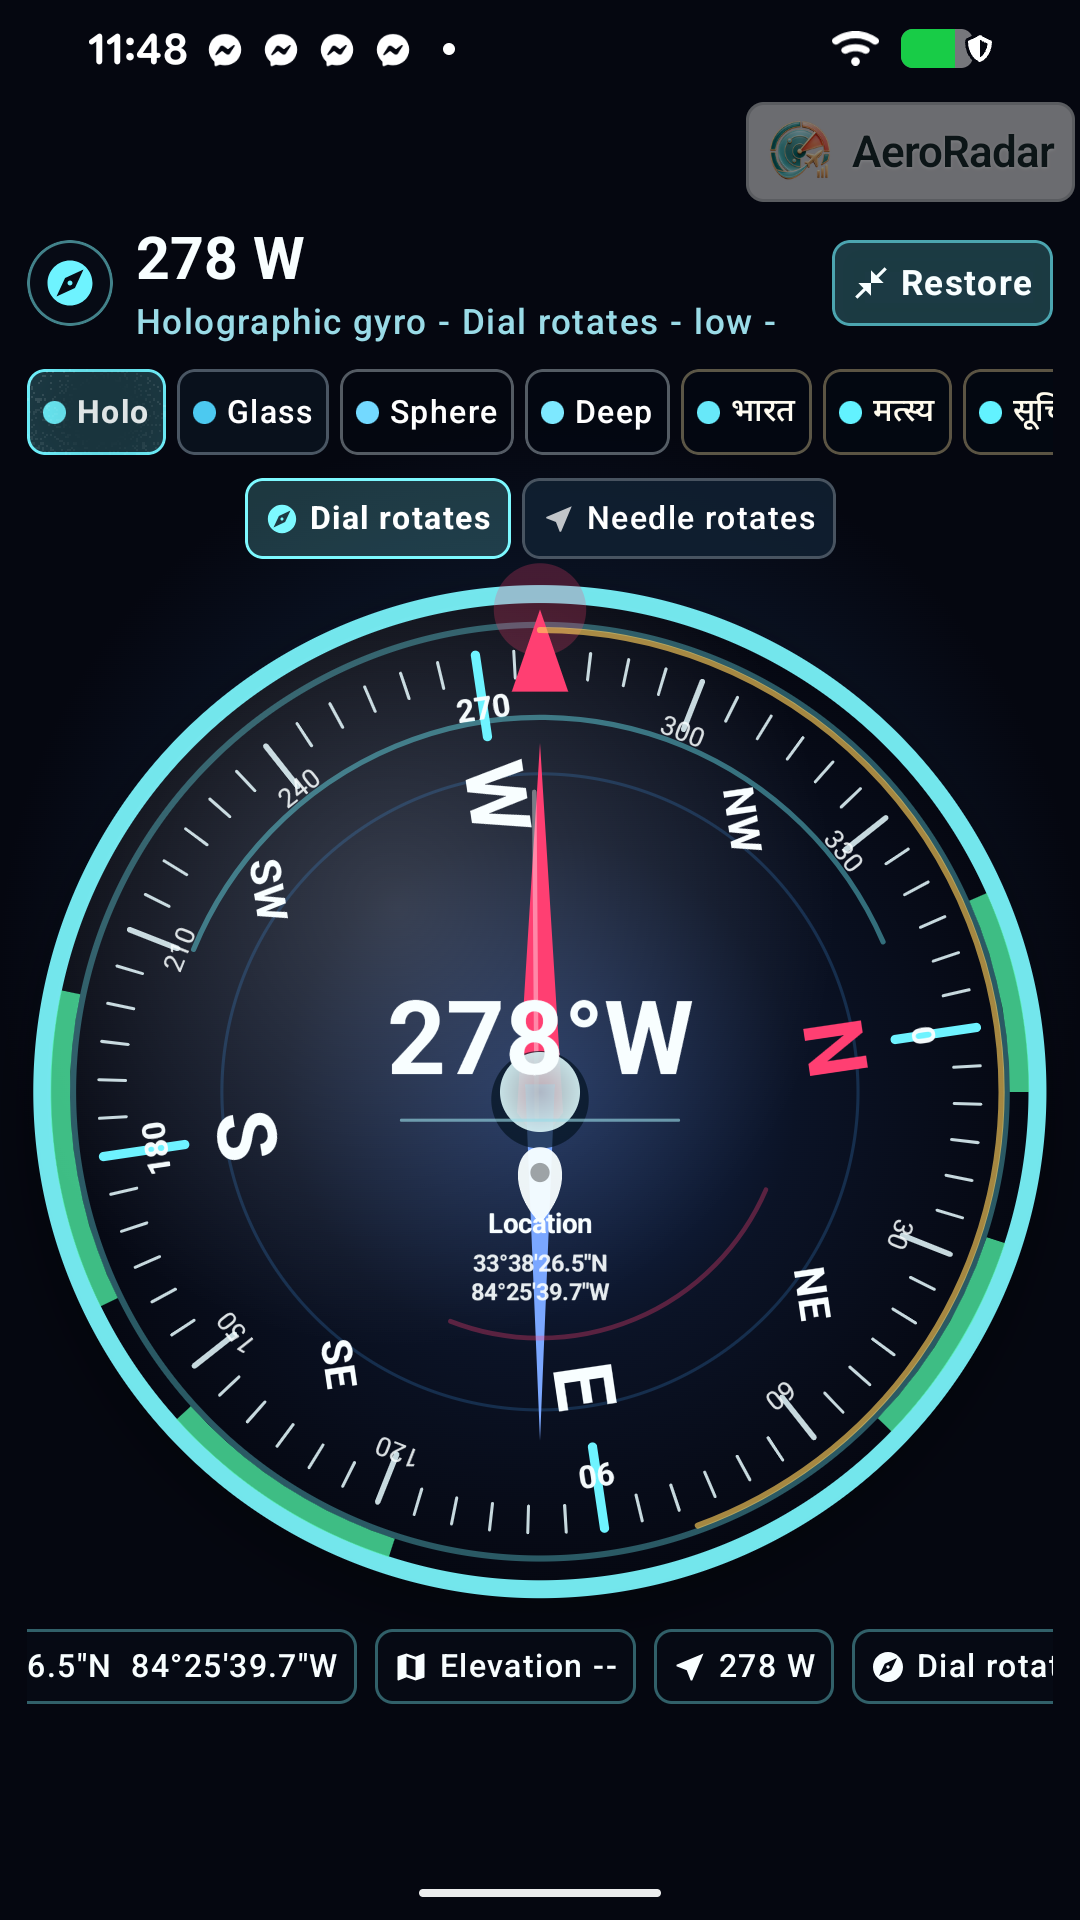
- Choose the skin you want to inspect in Magnetic compass tuning.
- Open its full-screen preview/instrument view.
- Rotate the phone slowly and watch the instrument’s heading change. Use the sensor-quality guidance if the heading is unreliable.
- Return to the previous screen to choose a different skin or size for the map overlay.
Chapter 30
Customize panel colors and readability
Open Settings → Advanced settings → Panel and legend tuning
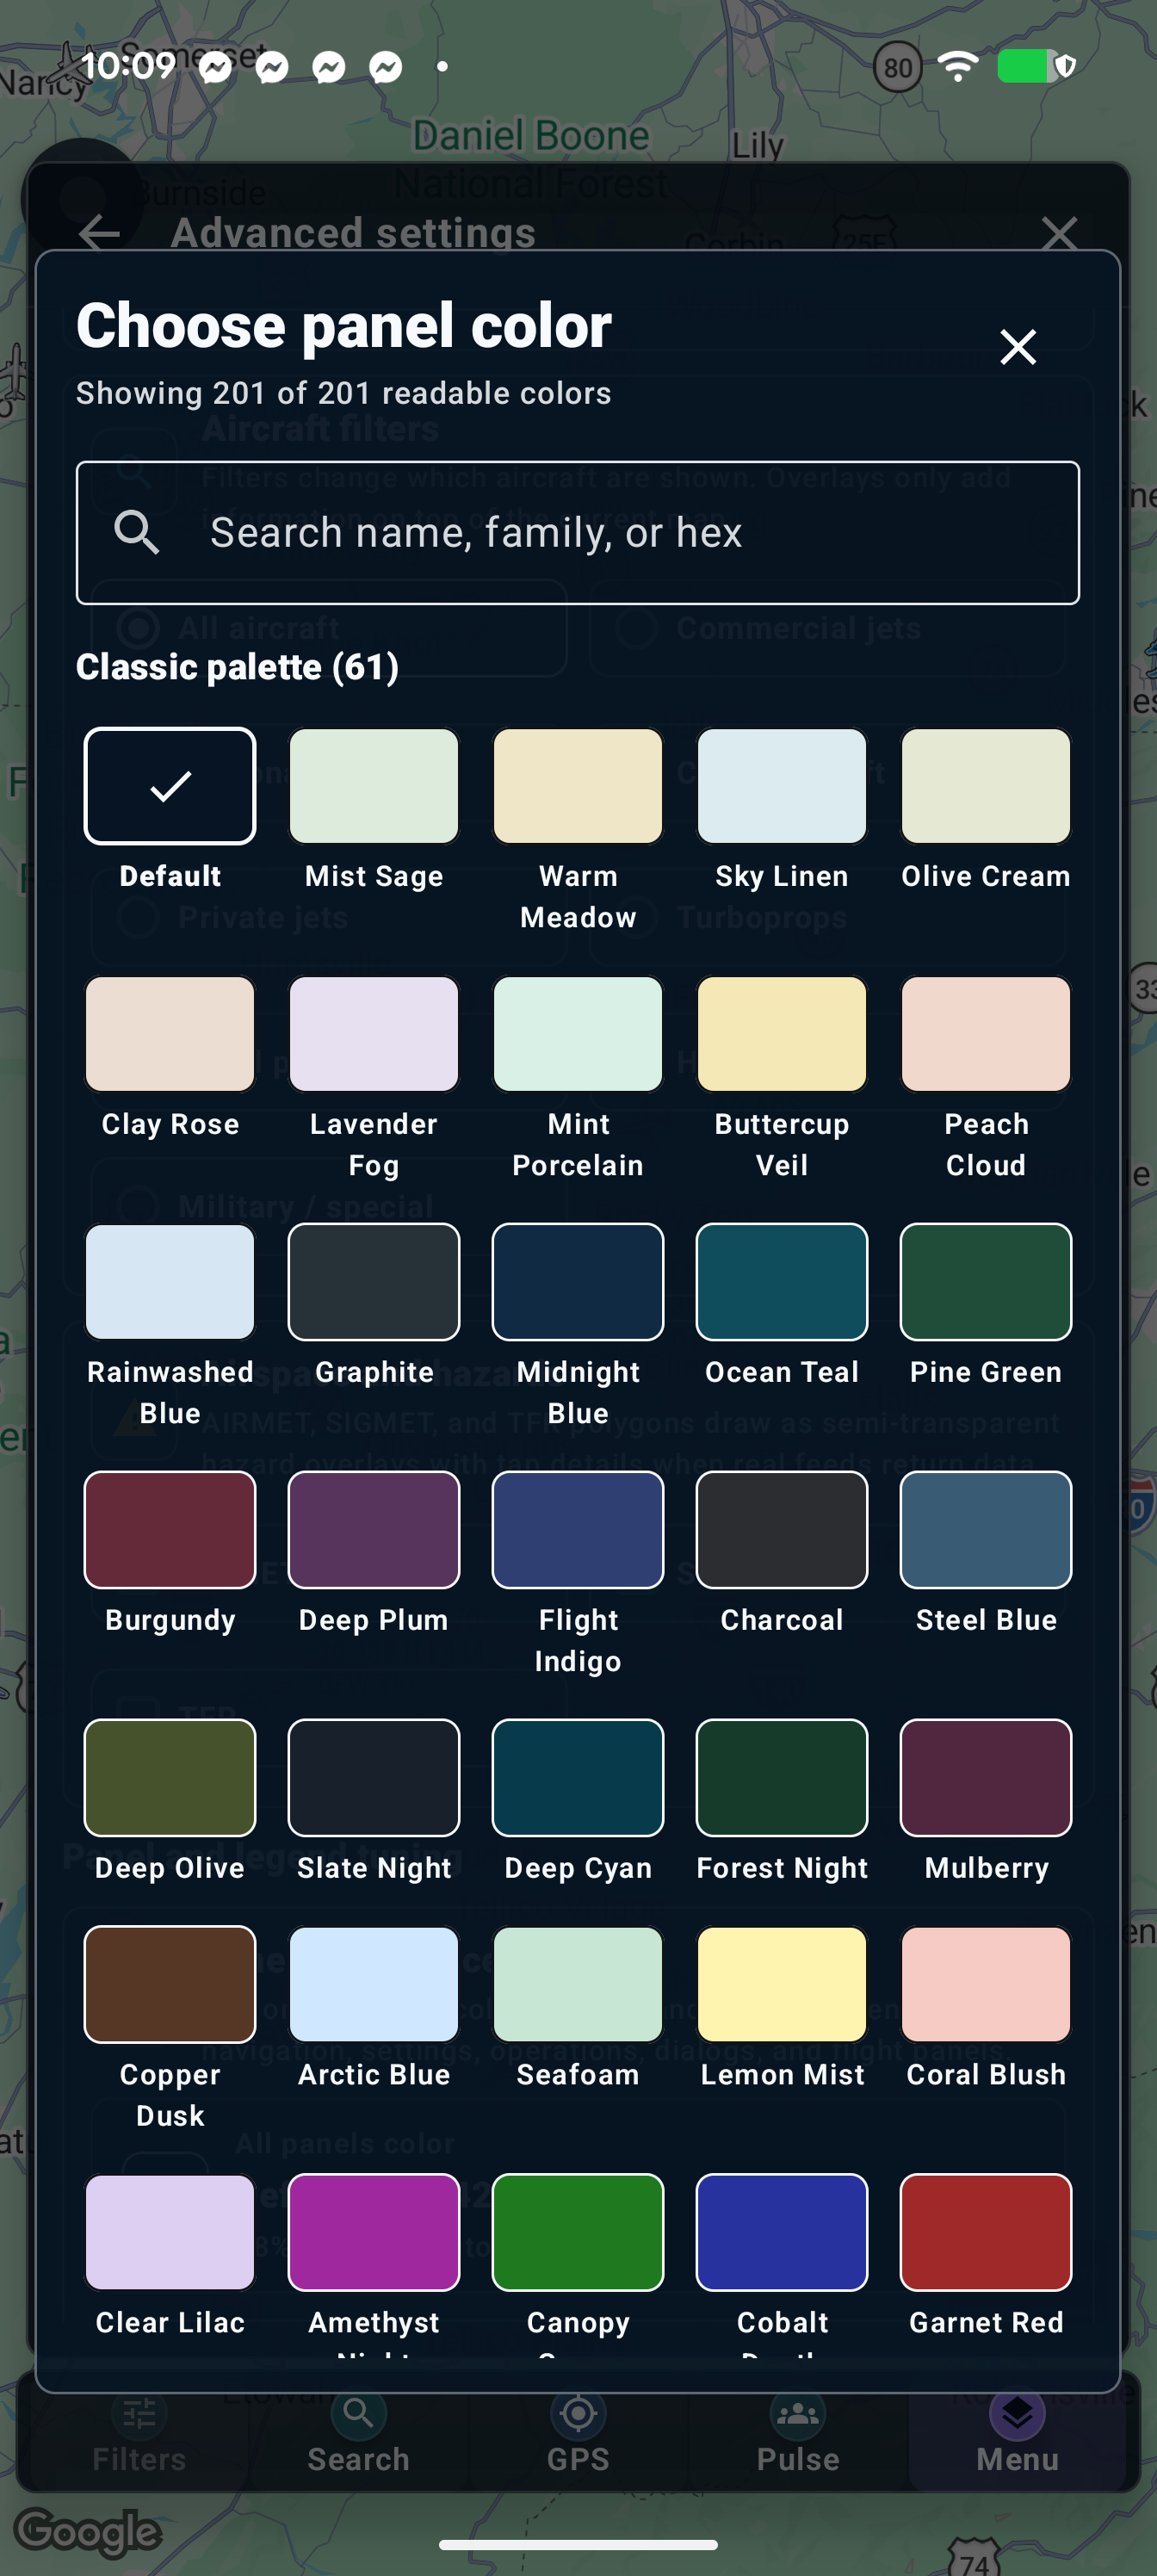
- Open Panel appearance and choose All panels to select a panel background color.
- Set Panel text color to a readable option with good contrast.
- Adjust Panel opacity. A more opaque panel is usually easier to read over a busy map.
- Return to a flight or Settings panel to judge the result. Use Reset to defaults if needed.
- Use Traveller mode and Helper tips according to your preference. These are separate from map layers and subscription access.
Appearance reset applies to the indicated appearance settings; it is not an instruction to clear app data or reset your account.
Chapter 31
Use hazards, add-ons and saved filters
Open Settings → Advanced settings → relevant section
- Under Advanced Live Radar add-ons, enable Airport delays when you want that context. The live aircraft source row explains the current source.
- Under Timetable display, switch Provider badges on or off.
- Under Airspace and hazards, enable AIRMET, SIGMET or TFR layers as needed, then inspect available map polygons and their details.
- Under Sky Spotter launch control, toggle Sky Spotter box to show or hide its map launch shortcut; Menu remains another way to open it.
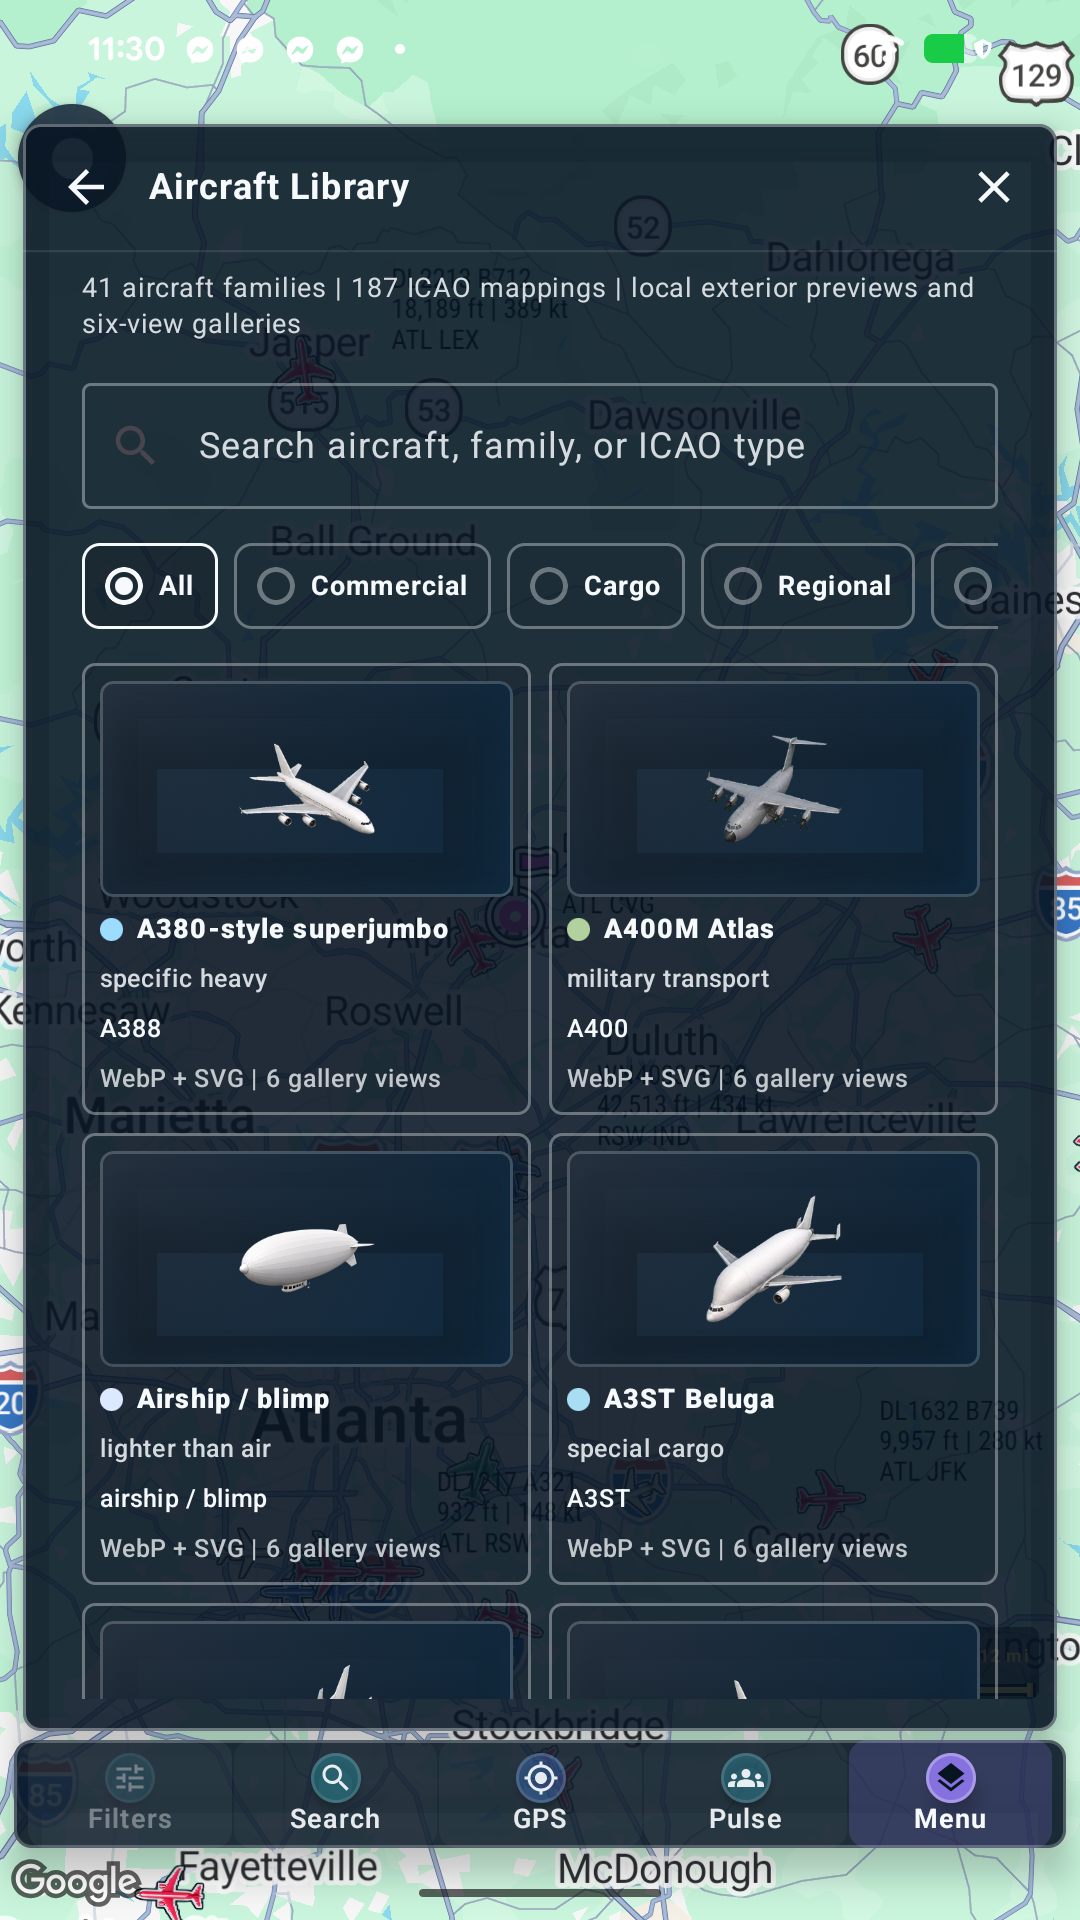
- Under Saved filters and aircraft references, use the saved-filter controls to apply or manage a reusable filter and open Aircraft Library for aircraft reference images.
Hazard layers depend on current feed coverage and effective times. They are informational and must not replace official flight-planning sources.
Chapter 32
Browse Aircraft Library and galleries
Open Settings → Advanced settings → Aircraft Library
- Open Aircraft Library from Saved filters and aircraft references.
- Browse or search the offered aircraft models/types and open an entry.
- Inspect the available exterior views and ICAO type mapping.
- Return to the library to compare another aircraft, or return to the map.
Reference gallery images help identify an aircraft type; they are not live photographs of the selected aircraft.
Chapter 33
Configure alerts and quiet hours
Open Settings → Alerts
- Allow AeroRadar notifications in Android if you want push alerts.
- Open Settings → Alerts and inspect your tracked aircraft alert rules. Enable the relevant groups for the aircraft you track.
- Use Refresh rule coverage to check that saved rules have enabled push triggers.
- In Quiet hours, enable Pause alerts and choose Start and End for a daily local-time window.
- Read Recent alert activity to inspect available notification history. Check quiet hours and Android notification settings if expected alerts do not arrive.
Quiet hours pauses notifications for the chosen window without deleting alert rules. No push triggers enabled means a tracked list alone is not enough.
Chapter 34
Manage your account and sign-in security
Open Settings → Account & Security
- Check the signed-in identity before changing settings or restoring a purchase.
- Review email verification and enrolled sign-in factors. Complete an offered verification flow using the newest code or link.
- Use supported profile preferences, such as language or home airport, and review cloud profile/preferences status.
- Use Sign out to switch accounts. Sign in with the same intended provider/account on your other device.
- For password entry, use the eye icon when available to check what you typed, then hide it again. Use the password-reset flow if you cannot sign in.
AeroRadar sign-in and Google Play’s purchasing account can differ. SMS is sent to the enrolled phone number; the device running AeroRadar can use Wi-Fi without a SIM. Administrator and reviewer access are separate from ordinary paid subscriptions. Account screens are not pictured to avoid publishing private information.
Chapter 35
Start a trial, subscribe and restore
Open Access screen or Settings → Account & Security → subscription controls
- Read the trial or Monthly/Annual offers actually shown for your account. Google Play displays the applicable price and terms.
- Choose an offer. If you have an eligible annual coupon, use Annual coupon code and Check Annual coupon before continuing.
- Continue to Google Play and complete its checkout. Return to AeroRadar and wait for server-side access verification.
- If you already purchased, use Restore with the correct Google Play and AeroRadar accounts. If verification is pending, retry Check access when offered after allowing the purchase to sync.
- Manage or cancel renewal in Google Play → Payments & subscriptions → Subscriptions. Access follows the verified entitlement period.
A payment-success message and an AeroRadar access confirmation are separate steps. Do not keep buying again to resolve a pending-verification message. Contact support with the app version and time of the error, without sending passwords or payment credentials.
Chapter 36
Request account deletion
Open Settings → Account & Security → Delete AeroRadar account
- Read the deletion explanation and decide whether you want to remove the account and associated data.
- Use Delete AeroRadar account in the app, or open the official web account-deletion page.
- Sign in or reauthenticate as requested, then submit the explicit deletion confirmation.
- Keep the request/status information provided and check its progress.
- Separately manage any Google Play subscription renewal; deleting the AeroRadar account does not itself cancel a Play subscription.
Read the current account-deletion instructions and privacy notice for scope, retained records and policy details.
Chapter 37
Find help, diagnostics and your app version
Open Settings → Help / how to, Diagnostics or App version
- Open App version to find your installed build, release note and available version history.
- Open Help / how to for the in-app quick start and feature guidance.
- Use Diagnostics to inspect status and prepare the available privacy-safe support report.
- Use Menu → Report an issue when you need to describe a problem. Include the feature, time, app version and what you expected.
- If Safe Mode appears after a crash, review its available report and recovery actions. Use Launch Normally when ready to retry.
Privileged Admin Diagnostics is for authorized administrators and is not needed for ordinary use. Do not include passwords, MFA codes, reset links or payment credentials in a support report.
Chapter 38
Troubleshoot common problems
Open Start with the affected feature
| Control or message | How to use it |
|---|---|
| Shared snapshot unavailable / Stale | Return to the live map and allow a refresh. Check internet access and use the traffic refresh control once. The HUD can recover automatically when a current snapshot arrives. Persistent failures should be reported with their time and build. |
| No aircraft | Check Aircraft traffic, filters, zoom/area, source freshness and network access. In Sky Spotter also check Range, GPS, compass quality and the direction the phone is pointing. |
| Verify your sign-in failed | Request a fresh code and use that current session. Check the enrolled number/authenticator and avoid repeatedly submitting an expired code. |
| Signed in, server could not verify access | Sign-in succeeded but access verification did not. Check connectivity and retry the offered Check access action. Confirm the account before restoring a purchase. |
| Play purchase verification pending | Wait for synchronization, use Restore/Check access with the same accounts, and contact support if it persists. Avoid duplicate purchases. |
| 3D slow or closes | Use 2D while checking app/device updates and the diagnostic report. Reduce visible layers; sustained 3D rendering can increase battery use and heat. |
| Replay missing or incomplete | Check the selected time/area and retained history availability. A live aircraft or schedule result does not guarantee historical samples. |
| Terminal guide review expired / impact unknown | Follow the displayed source link and confirm current information with the airport or airline. Unavailable evidence is not a confirmed normal condition. |
| A control is missing | Scroll within the panel or sideways across its toolbar. Check Settings → App version against this guide; update through your eligible Play track. |
| Text or buttons hard to read | Use Settings → Advanced settings → Panel appearance to improve contrast and opacity. Check Android display/font size and include the affected screen in a report. |
More help: AeroRadar support. This app is for information and exploration; confirm travel decisions with official sources.